Deburring

Kitchen Knife Forums

Help Support Kitchen Knife Forums:

This site may earn a commission from merchant affiliate links, including eBay, Amazon, and others.

Nemo

Staff member
Global Moderators
KKF Supporting Member
Joined
Oct 15, 2016
Messages
7,534
Reaction score
3,929
Location
NSW (Aus)
I'm curious about the different deburring techniques that people use.

By the time I get to deburring, I've already worked at minimising the burr with lighter and lighter pressure so the burr is pretty small.

I have used the multiple strops followed by lateral stroke (followed by cork) technique with success. Any pointers about how many strops to do? Obviously more for harder to deburr steels. I guess I'm asking whether there is an end point to look out for or do you just have to use the TLAR ("that looks about right") technique?

I've also used the "cutting the water technique". I've always tried to replicate the edge angle on a clean stone, with the lightest touch that I can muster, which seems to work OK too. I've also seen it described as a microbebelling technique which maybe implies a higher angle?

What other techniques do people use?

How do you determine when deburring is adequate or complete?

Please share your tips for deburring.
 
I take the "micro bevel" approach

I work up some extra mud with a nagura or diamond plate after sharpening at my edge angle if required alternating edge leading strokes to minimise the burr. Cant say exactly how many strokes as it depends on how large a burr/size of knife and the speed of the stone but maybe around 10 ultra light strokes each side for a 24cm blade? This number can vary a bit though. From my understanding by leading into the mud it abrades any burr and is less prone to creating wire edges. Lately i have been trying to cross the scratch patterns too which may or may not help. The edge is pretty clean at this point.

I can set my micro now using either the same stone or I may change out depending on desired polish. I'll clean off the stone and apply a micro bevel which can vary on angle depending on how fine a stone i am finishing on and the capabilities of the knife. Usually I will use double the edge angle but if im going for high polish (6k plus) it could be even more than that, particularly for stainless knives. This is done alternating edge leading and trailing/stropping strokes. Usually don't need many strokes (i check after every 4 or so for smaller knives) although it can take a couple of extra strokes if i moved to a finer stone. Ordinarily I would use a hard stone for this purpose so as to reduce the chances of gouging the stone. Finishing with stroppin strokes helps with keenness but can draw a wire if too many are used

As an alternative i have found that raising a mud and alternating edge trailing can also work for this step if I have trouble getting a shaving finish. Just be aware that wire edges can form easily here. I haven't decided which approach is better yet but the latter allows me to use softer/ more friable stones. Do note that the force here is minimal as possible for either approach and try to maintain angles as close as possible.

Touch ups should be a couple stropping strokes at the same micro angle to bring back keenness.

As for knowing when to finish I guess I check for "bite" along the way to make sure nothing has been lost. The thumbnail tech is good for checking for this. It should bite moving both up and down the blade. This occurs before I apply my microbevel. If it lacks bite on a push i apply tip to heel edge leading strokes or heel to tip edge trailing. If lacking bite on a draw I do the opposite. You shouldn't lose any bite from applying a micro bevel. If you have you might need to work on the edge bevel a bit morr.

I also shine a light from my phone directly on the edge periodically to see if it reflects light at all when looking directly at the edge. Any reflected light means I haven't prepared the edge for a micro yet. I tilt the knife to see the sides of the edge as well to see if the edge is rolled to a particular side as well before applying a micro
 
minimizing burr on stones is really all you need, and then pull through with cork. the way i test is i shave tomato. and then do a second tomato, if it doesnt lose any sharpness feel then there is no burr left. you will notice right away if there was still burr left because it will feel less sharp on the second tomato.
 
I do crisscrossing very light alternating edge trailing and edge leading passes with water only (generally on a hard stone), then strop on jeans or clean balsa. Dry stone is an approach I use some times as well as the cork thing.
 
Grind alternating burrs then edge trailing passes on sharpening stones with lighter pressure; edge trailing passes on finish stone with very light pressure; strop on cow hide (unloaded). Then pass through cork. I certainly don't have it mastered, but I have sharp knives. Always room for improvement. Interesting thread, thanks.
 
Are ya'll doing (any) segmented sharpening
or just deburring on your finishers?
 
Are ya'll doing (any) segmented sharpening
or just deburring on your finishers?

What do you mean segmented sharpening?

I deburr on every stone before moving up grit level, then I very light strokes to knock off the final burr on my final stone, and do some stropping strokes on the stone on both sides. I run my finger perpendicular to the edge along the entire blade on both sides to feel for any burr I missed, once it’s all smooth on both sides I strop on newspaper stack just by running the blade backwards a few times at the angle of my sharpening previously. I don’t think you could strop it too much as long as your angle is consistent with the previous one on stones.

Microbevels aren’t for removing burrs from my understanding, I’m pretty sure they are just used to add an extra sharpness and help with edge retention. And I just do that on the final stone a couple times each side with the blade angle slightly higher than what was previously used. When stropping I do it at the original angle not the microbevel angle
 
Also knowing when you’re done from my experience it’s when you have a burr up and down the entire edge check by rubbing your finger perpendicular against the blade, then go to the other side same thing, then knock Off the burr on the first side with light strokes until when you rub perpendicular against the entire edge on both sides you feel No burr/catch and is completely smooth. And you can finish on a 200 or 20,000 grit, Then strop it to get it completely smooth and polished by doing it like 5 strokes each or more if you want. And I test it with paper, I feel it’s the best because when you pull through the paper with the Entire blade it Will Catch wherever you left a burr no matter how small, if there’s no burr at all it will be completely smooth when you pull the blade from heel to tip through the paper.
 
I don't typically use a strop but will strop on the stones. I try to remove as much burr as possible on the first stone. What I do is raise the burr then I lower pressure and make that burr smaller and then repeat. After that I reduce the pressure again and strop on the stone a few times on one side then flip, rinse and repeat. Then I reduce pressure again and strop one stroke per side alternating and feel the edge here and there until the burr seems to not be there. At that point I do a lateral stroke on the stone. As Jon points out, this should draw a line on your stone if it removes the burr. Normally this is all I need to do to remove the burr.

Then I can move on to the next stone and NOT raise a new burr because there is no need. However, sometimes stuff happens and if that is the case I would deal with it the same way. Anyway, with some steels on a combination of specific stones a bit of residual burr seems to hid there and I can not feel it so it comes on on the next stone.

Having said that, pulling through a chunk of balsa, felt or cork works too. Stropping on felt works too. As does stropping on a stack of slack newsprint with a higher angle but I would only do that after the first stone to avoid too rounding. Maybe that is just me being over cautious though.
 
This is one area that I stumbled through because there are so many opinions on what approach to take.Some sound good,some sound like a pain,some sound to extreme and some don't make sense. So,when I ran across Jon's video on how he does it,I pretty much stick to it.It is simple and gets to the point but it also works.
 
I am using Cater guide for sharpening and removing of burr. Perhaps you can find it on youtube but for sure it is well explained in his sharpening videos. Sometimes I do this on every stone, sometimes only on mid and high grit ones.

When I raise the burr on the stone on both side I repeat the process a few times with lighter strokes. This to flip the burr left and right a few times to weaken it. After that I deburr on wood. Then I finish in the following way:
1. 5 edge trailing moves on right side
2. 5 edge trailing moves on left side
3. deburr on wood
4. 2 x edge trailing moves on right side followed by left side
5. deburr on wood
6. few strops on felt

for me this is bullet proof method and it gives me knife without any burr. You can incorporate also micro bevel if you want. Just use higher angle in points 1 and 5 (this is of course putting micro bevel only on one side like Jon is propagating).

Carter kills me with a bunch of his random techniques. And he’s Always Only sharpening pocket knives. Not doubting him, but like the wood for instance that doesn’t dull the blade at all?!
 
Carter kills me with a bunch of his random techniques. And he’s Always Only sharpening pocket knives. Not doubting him, but like the wood for instance that doesn’t dull the blade at all?!

Well, you are tearing off the burr so it isn't going to leave you with a finished edge, which is why he goes back to the stones. It works fine but it isn't the way I like to do things. I am sure his edges beat the hell out of mine though! Also, I find sharpening folders to be harder than sharpening kitchen knives. Normally a lot more belly in a short sweep. PITA.
 
I do not think anything is wrong with this method since it produces hair whittling sharp knives.
 
I usually debur on stone using edge leading stokes, alternating from left to right, usually 10 strokes is enough. If I want to remove the tiny burr left I use leather strop loaded with chromium oxide. 3 stokes on each side and done. I dont pull through wood or cork, after some ****** experience with VG 10
 
Microbevels aren’t for removing burrs from my understanding, I’m pretty sure they are just used to add an extra sharpness and help with edge retention.
Microbevels do help to remove burrs, plus they help with edge retention as you say. There's a little sacrifice of sharpness in doing so, but it's totally worth it.
If you use a soft abrasive stropping surface that has 'give', e.g. leather, it will curve (or round) the edge over - essentially a microbevel.

3L6vdI9.jpg


Many of us factor this change of angle into our bevels, and initially sharpen at a shallower angle to allow more clearance for the final microbevel.

Also, pulling through wood to deburr won't do anything to damage the edge. If doing so were to damage the edge substantially, that'd mean your sharpening job would get trashed upon touching the cutting board anyway.
In other words, pulling the edge through wood is actively weeding out any part of it that won't live up to the task - such as the burr.
 
On a side note: a micro-bevel is more effective if you really cut it, instead of rounding the edge. The benefit is in keeping — almost — the original thin geometry, and only making stronger the very edge.
 
Well, you are tearing off the burr so it isn't going to leave you with a finished edge, which is why he goes back to the stones. It works fine but it isn't the way I like to do things. I am sure his edges beat the hell out of mine though! Also, I find sharpening folders to be harder than sharpening kitchen knives. Normally a lot more belly in a short sweep. PITA.

Yeah exactly. And yeah I’m definitely Not doubting him I Know he would put me to shame with sharpening, it just doesn’t make sense sometimes what he does.
 
Microbevels do help to remove burrs, plus they help with edge retention as you say. There's a little sacrifice of sharpness in doing so, but it's totally worth it.
If you use a soft abrasive stropping surface that has 'give', e.g. leather, it will curve (or round) the edge over - essentially a microbevel.

3L6vdI9.jpg


Many of us factor this change of angle into our bevels, and initially sharpen at a shallower angle to allow more clearance for the final microbevel.

Also, pulling through wood to deburr won't do anything to damage the edge. If doing so were to damage the edge substantially, that'd mean your sharpening job would get trashed upon touching the cutting board anyway.
In other words, pulling the edge through wood is actively weeding out any part of it that won't live up to the task - such as the burr.

Okay I see what you’re saying thanks for pointing that out about the wood. Thanks for clarifying on the microbevel too. How do you deburr?
 
Microbevels do help to remove burrs, plus they help with edge retention as you say. There's a little sacrifice of sharpness in doing so, but it's totally worth it.
If you use a soft abrasive stropping surface that has 'give', e.g. leather, it will curve (or round) the edge over - essentially a microbevel.

3L6vdI9.jpg


Many of us factor this change of angle into our bevels, and initially sharpen at a shallower angle to allow more clearance for the final microbevel.

Also, pulling through wood to deburr won't do anything to damage the edge. If doing so were to damage the edge substantially, that'd mean your sharpening job would get trashed upon touching the cutting board anyway.
In other words, pulling the edge through wood is actively weeding out any part of it that won't live up to the task - such as the burr.
Kip, do your knives essentially have a zero grind with a micro-bevel on them? Is it a one sided microbevel?

When making the microbevel, do you use edge trailing or edge leading strokes? Presumably with super light pressure?
 
Kip, do your knives essentially have a zero grind with a micro-bevel on them? Is it a one sided microbevel?

When making the microbevel, do you use edge trailing or edge leading strokes? Presumably with super light pressure?

Yeah I want to know this too!?
 
I thin aggressively to a zero grind, then add my two small sharpening bevels on both sides at angles that you'd normally set a microbevel. It's what panda was getting at earlier in the thread.

I deburr by using edge-leading strokes on the stone at the end, what some people call "slicing the water". Medium pressure, alternating strokes.
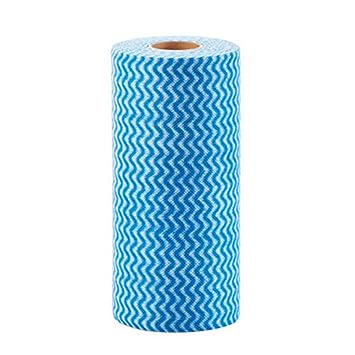
My favorite strop is a really hard cardboard tube (from the middle of a large roll of disposable fabric towels) with no abrasives on it. It's perfect: light weight, disposable/cheap, no flex, perfect size, slightly abrasive, and if you strop with too much pressure it bends the cardboard instead of the steel - kinda self regulating.

61YUA-48waL._SY355_.jpg
images


For stubborn stainless steels that hold on to a burr I use any of the well known methods, depending on whatever is on hand at the time. Scotchbrite scratch pads, wood, cork... they all get the job done.

Nice thanks so much that’s really interesting! So do you just keep the roll as is or do you flatten it at all? Also just to clarify on the Zero Grind, you mean there is no real distinct bevel degree it is 0, it is Flush with the entire knife, unlike my edge i just put on is a 12/15degree edge.

I was just reading that a lot of people have zero degrees on Netherlands knives, and especially Convex knives. So I guess that’s my question, since my new Masashi is convex should I have tried to Just put a Zero Grind with Microbevel I stead of the 70/30 bevel at 12/15 degrees with a microbevel on the 70 side at probably 25-30 degrees?!? I guess my question, besides it moving through the product much cleaner does this at all effect the food release?
 
Nah it doesn't affect food release. Do it on your own knives if you want, its totally up to you.

I don't flatten the roll.
 
Nah it doesn't affect food release. Do it on your own knives if you want, its totally up to you.

I don't flatten the roll.

Okay cool. I’ll have to give it a shot over some time with my Gekko. I just fear with the Masashi since it’s my workhorse now, that such a thin edge will chip real easy. Before I put the new bevel on it I had already gotten some microchips from use
 
The reverse direction panda, you'd cut into it if you used it like a steel. :rofl2:
 
Back
Top