
You are using an out of date browser. It may not display this or other websites correctly.
You should upgrade or use an alternative browser.
You should upgrade or use an alternative browser.
Daily Sharpening Pics
- Thread starter cotedupy
- Start date


Help Support Kitchen Knife Forums:
This site may earn a commission from merchant affiliate
links, including eBay, Amazon, and others.


"sharpie" uh-huh...
"sharpie" uh-huh...

The only stone I've ever ground my pads off on was my SG500.
Tingle, tingle... sting... well that's weird... OW!
I've done that, once. On a diamond stone. Learned really quick what NOT to do...
The only stone I've ever ground my pads off on was my SG500.
Tingle, tingle... sting... well that's weird... OW!
I've done that, once. On a diamond stone. Learned really quick what NOT to do...
Yeah that sucks and takes a bit to heal.
Heat sucks on it!Yeah that sucks and takes a bit to heal.


Takeda family photo.
I need to get some more of his stones, the single one I have is amazing.
MattPike4President
Well-Known Member
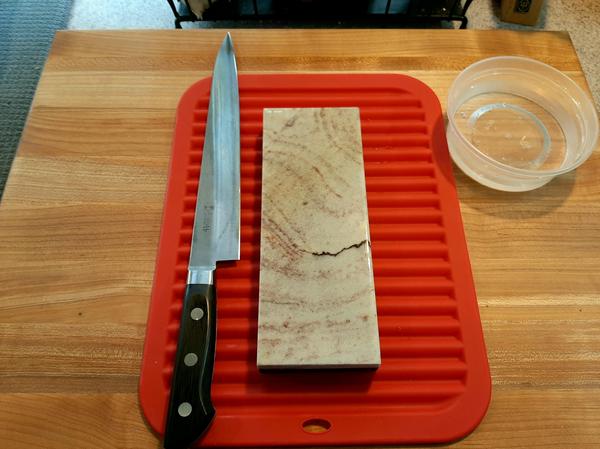
Weekly touch up, maybe if I had saved money and bought Shapton instead of Naniwa I could have bought a stone holder ") . Knife is a Masashi Koi, stone is Naniwa Pro 3k
. Knife is a Masashi Koi, stone is Naniwa Pro 3k

. Knife is a Masashi Koi, stone is Naniwa Pro 3k
Playing around with my new Gesshin 6k Resinoid

Greasylake
Thick knives save lives
Finished my first "refurb" today. It's not super pretty, and I may spend some more time on it in the future to clean up the bevels a bit more.
This is how the knife looked once I knocked the handle off


I went ahead and soaked it in rust remover and used a brass brush to clean off all the rust and scale, and used some steel wool to clean off the evaporust patina.
The knife seemed to be pretty much entirely forged to shape, with the only grind marks I could see being on the spine and choil.


After this I took it to the stones and removed 90% of the pitting, all the chips, and flattened them mildly, then went ahead and sharpened and popped the handle back on.
Here is the knife as it sits today:


Thanks for looking
This is how the knife looked once I knocked the handle off
I went ahead and soaked it in rust remover and used a brass brush to clean off all the rust and scale, and used some steel wool to clean off the evaporust patina.
The knife seemed to be pretty much entirely forged to shape, with the only grind marks I could see being on the spine and choil.
After this I took it to the stones and removed 90% of the pitting, all the chips, and flattened them mildly, then went ahead and sharpened and popped the handle back on.
Here is the knife as it sits today:
Thanks for looking
Sakai Kikumori on another Soft Arkansas.
Breaking in the BBW side of this monster, I really like it! You can see the old razor size coti that was my great grandfather's in the finished pic, and the big one fells like it's just the huge version of that (bbw side at least). I also got to confirm that the bevels on this Hinoura are slightly concave, so I'm going to mess around with doing some stone powder polishing on it to even it out.


Some random things I've sharpened and/or fixed recently.
The first Hoffman rescue knife I've sharpened.


Shiny and hazy...


Old grindy thing


The first Hoffman rescue knife I've sharpened.
Shiny and hazy...
Old grindy thing
Renge suita powers, combine!


Touched up my “thinned to the point of no return” denka. I had folded the edge over at the thinnest part, so I spent a little longer taking some steel off on this semi-finisher.
I think I’ve come fully to the point where I realize that stropping was my own personal crutch for poor technique. Turns out if I pay attention and follow the feedback, it’s not really needed anymore .
.
Touched up my “thinned to the point of no return” denka. I had folded the edge over at the thinnest part, so I spent a little longer taking some steel off on this semi-finisher.
I think I’ve come fully to the point where I realize that stropping was my own personal crutch for poor technique. Turns out if I pay attention and follow the feedback, it’s not really needed anymore
.The forum motivated me to pull out the SG4k and keep experimenting with it. Akifusa in Aogami Super (great knife btw).
The art of the touch up. The thinnest of koba. (Not really)


Man white steel gets crispy. But doesn’t hold it. I’ve recently figured out the touch on a couple stones for lightly restoring the raging HHT-ness of white #2. I never used to be able to do this, maybe it’s levelling up from too much Takeda sharpening, maybe it’s clean water on stones, who knows. Basically no steel comes off. I’m hanging onto the tiny chip in the bunka going on 6 months.
The usual suspect

That suita. Again. This thing is amazing @Hassanbensober. You don’t see much happening but you can feel it. Fast enough to be predictable, hard enough to make it easy.
Full patinas live on!

Man white steel gets crispy. But doesn’t hold it. I’ve recently figured out the touch on a couple stones for lightly restoring the raging HHT-ness of white #2. I never used to be able to do this, maybe it’s levelling up from too much Takeda sharpening, maybe it’s clean water on stones, who knows. Basically no steel comes off. I’m hanging onto the tiny chip in the bunka going on 6 months.
The usual suspect
That suita. Again. This thing is amazing @Hassanbensober. You don’t see much happening but you can feel it. Fast enough to be predictable, hard enough to make it easy.
Full patinas live on!
Last edited:
The lowest of the low - Imanishi amakusa. $20 for a 5lb brick. Cheaper than a stone holder. Feels weird, slippery and gritty at the same time. Couldn’t do squat with this, my very first natural stone, for about a year. Forget setting bevels, I couldn’t even get a good burr up.

A full weekend of prep was a bit much for my honesuki, and what the heck at least I don’t have to baby this thing. A little aizu slurry to get the ball rolling and out pops a surprisingly clean edge, with minimal worry and effort. The feedback leaves much to be desired, but it’s a good lesson to myself that not every stone needs to be of some exotic pedigree and cost 3-4 figures to be good. Just a little more time and some unknown revelation in my sharpening process. Great freaking edge.
A full weekend of prep was a bit much for my honesuki, and what the heck at least I don’t have to baby this thing. A little aizu slurry to get the ball rolling and out pops a surprisingly clean edge, with minimal worry and effort. The feedback leaves much to be desired, but it’s a good lesson to myself that not every stone needs to be of some exotic pedigree and cost 3-4 figures to be good. Just a little more time and some unknown revelation in my sharpening process. Great freaking edge.
Last edited:
I had very limited time before me with a S. Tanaka that needed sharpening and borderline to get a real serious thinning session. Decided to cut a relief for now, and just try to hit and polish the core a bit while I was at it. Trying to keep collateral damages to the minimum possible. SG320 starting point.


The essential work done. Polishing came next with SG500 and SG6K.

The modest end results. That real thinning is now unavoidable next time around.


There will be some slight overgrinds to see about, but overall it looks like it should be a pretty straightforward thinning.

Relief vs. micro.
Must admit I was pretty impressed with the abilities of the SG6K to take over SG500 for polishing the core, especially in such a hurry as I worked this out. The 6K develops a good dark mud quite readily, doesn't need much babying neither once you get it. I thought it managed to feel pretty good at it too, more than I expected.
The essential work done. Polishing came next with SG500 and SG6K.
The modest end results. That real thinning is now unavoidable next time around.
There will be some slight overgrinds to see about, but overall it looks like it should be a pretty straightforward thinning.
Relief vs. micro.
Must admit I was pretty impressed with the abilities of the SG6K to take over SG500 for polishing the core, especially in such a hurry as I worked this out. The 6K develops a good dark mud quite readily, doesn't need much babying neither once you get it. I thought it managed to feel pretty good at it too, more than I expected.
I noticed the last sharpening of my old Takeda bunka resulted in a wonderfully consistent burr. This was done all on synthetics from 400 up. This time the heavy grinding was done with a Hideriyama supposedly from Takeda himself, and refined on a progression of jnats.

I used an ozuku that’s super hard and fine as a finisher. I’m pretty sure it‘a a razor stone, but I impulse bought it at the same time as I got that amakusa. Also have had zero good results with it until now. The feedback is surprisingly alive for such a fine stone, and the edge it gives on this AS is about as keen as I’ve gotten from a natural stone. No strop HHT!
I used an ozuku that’s super hard and fine as a finisher. I’m pretty sure it‘a a razor stone, but I impulse bought it at the same time as I got that amakusa. Also have had zero good results with it until now. The feedback is surprisingly alive for such a fine stone, and the edge it gives on this AS is about as keen as I’ve gotten from a natural stone. No strop HHT!
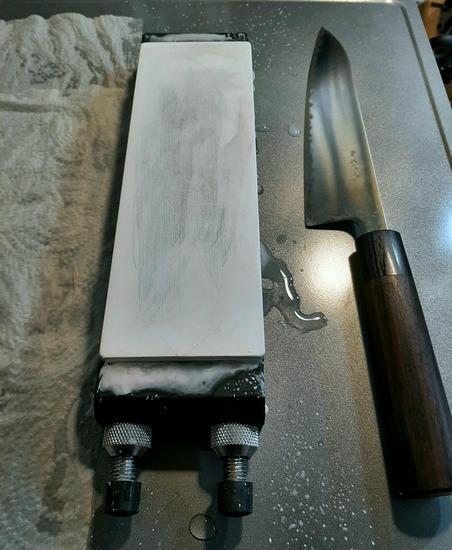
Not technically a sharpening pic but another forum I engage in asked to see pictures of people's most used sharpening gear so I thought I'd drop the pic here as well.
BillHanna
Gotta get ready for ARM
YOU. WHORE.another forum I engage in

Who plays Chris Rock?Think of it as a Will and Jada type of arrangement.

Had to take a bit of care to the Sukenari HAP-40 that was lent to a friend of mine for a good while... Since my initial refinish after some work wasn't ideal, nor the blade extravagantly thin BTE, I went for a second maintenance thinning and refinish... AND sharpening.
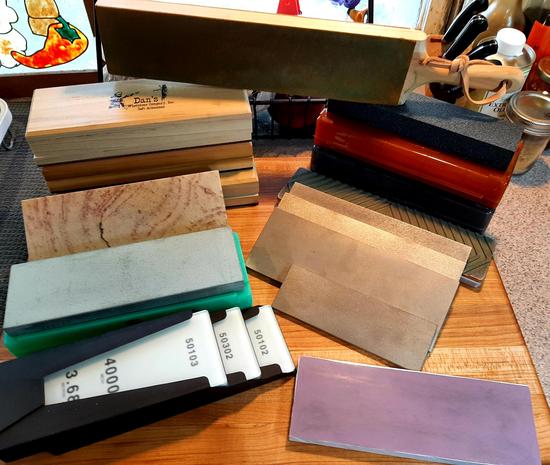
Stones made available for the entire purpose:


Of the permasoaked Cerax 320, Cerax 700, Cerax 1K and Ouka were used. Also the Arashiyama 1K (not perma) tucked on top of the plastic container here.
Most of all for different purposes but quite a few coming back around for both polishing and sharpening: Cerax 320, Ouka, Shapton 4K and Shapton 6K

Thinning/Repolish: Cerax 320

Core/Clad Cleaning: SG500 and it sure made that overgrind nearing the heel on the right side of the blade prominent again...

I think this was after SG4K but could be SG6K. Nothing much separating both on HAP-40. Cleaned around the overgrind making it even more pinpoint.
Then Cerax 700, Arashiyama 1K and Ouka for repolishing over... Aaaand Cerax 320, Cerax 1K and Ouka for resharpening.
Then SG4K for some slight refining of the edge, and SG6K for deburring further. Then one swipe per side on 1u diamond paste fine leather strop. Some sandpads along the way.


Less ugly than after my first refinish, but ugly still yet what I call functional finish alright. Some weirder stuff happening at the tip on both sides as is customary.
I don't get rid of overgrinds and weird stuff in a go or a few nowadays because I'd rather not flatten the wide bevel/15-25mm BTE too much. Hence the weird stone progression that basically ensures me I keep the core clear and nice while retaining original geometry. Then with typical vertical Migakis I'll just use a blend of longitudinal and vertical, usually 320 vertical and #800 both ways. Camouflages some, looks about right, keeps with the original behavior somehow. In my experience, finer finishes or going against a vertical migaki is never much a winning move. I'd rather slowly but surely keep the kinfe an equal balance of none too flat and none too nice looking.
The tool for every single part of getting that meal ready:

Stones made available for the entire purpose:
Of the permasoaked Cerax 320, Cerax 700, Cerax 1K and Ouka were used. Also the Arashiyama 1K (not perma) tucked on top of the plastic container here.
Most of all for different purposes but quite a few coming back around for both polishing and sharpening: Cerax 320, Ouka, Shapton 4K and Shapton 6K
Thinning/Repolish: Cerax 320
Core/Clad Cleaning: SG500 and it sure made that overgrind nearing the heel on the right side of the blade prominent again...
I think this was after SG4K but could be SG6K. Nothing much separating both on HAP-40. Cleaned around the overgrind making it even more pinpoint.
Then Cerax 700, Arashiyama 1K and Ouka for repolishing over... Aaaand Cerax 320, Cerax 1K and Ouka for resharpening.
Then SG4K for some slight refining of the edge, and SG6K for deburring further. Then one swipe per side on 1u diamond paste fine leather strop. Some sandpads along the way.
Less ugly than after my first refinish, but ugly still yet what I call functional finish alright. Some weirder stuff happening at the tip on both sides as is customary.
I don't get rid of overgrinds and weird stuff in a go or a few nowadays because I'd rather not flatten the wide bevel/15-25mm BTE too much. Hence the weird stone progression that basically ensures me I keep the core clear and nice while retaining original geometry. Then with typical vertical Migakis I'll just use a blend of longitudinal and vertical, usually 320 vertical and #800 both ways. Camouflages some, looks about right, keeps with the original behavior somehow. In my experience, finer finishes or going against a vertical migaki is never much a winning move. I'd rather slowly but surely keep the kinfe an equal balance of none too flat and none too nice looking.
The tool for every single part of getting that meal ready:
I bought this kanna for its obvious intended purpose: to test stones. The problem is the edge is rounded off to the point where almost no core steel gets polished. I’m not sure if it was like this when I got it, or if it was a result of my initial ineptitude.

Sooo SP120, and some shameful misconduct - using the stamped side of the stone.

Thoroughly unpleasant but wow is it fast. Kind of excited to start from a clean slate with this.
Sooo SP120, and some shameful misconduct - using the stamped side of the stone.
Thoroughly unpleasant but wow is it fast. Kind of excited to start from a clean slate with this.
Nothing exciting...

SG500 on the BST Masamoto KS.
Very light trailing to barely of a burr, feather light leading until it sounded clean.

A thick marker line to ensure I kept to the original beveling, just restoring the apex. Printer paper was of the cleanest cuts afterwards so I just finished on SP2K with leading strokes only. Slicer edge alright. Think I like the combo SG500 - SP2K even more than I did SP1K-SP2K. For a slightly microchipped edge going dull with a fine grain steel it works fast and clean.
SG500 on the BST Masamoto KS.
Very light trailing to barely of a burr, feather light leading until it sounded clean.
A thick marker line to ensure I kept to the original beveling, just restoring the apex. Printer paper was of the cleanest cuts afterwards so I just finished on SP2K with leading strokes only. Slicer edge alright. Think I like the combo SG500 - SP2K even more than I did SP1K-SP2K. For a slightly microchipped edge going dull with a fine grain steel it works fast and clean.
Found two tiny chips in my Takada nakiri and my Mazaki petty. 400/1000/strop-with-compound, and they are gone. Post-picture, I also buffed out the orange patina on the nakiri with some baking soda paste and microfiber, looking too much like rust for my comfort. Heck, maybe it was rust...

In the midst of restoring an old y. Kato that has only seen food and no stones for about 12 years. First time cutting a convex relief bevel.. I’m really enjoying the cerax 320. Aside from the soaking and insane mud production it’s great - cuts moderately well, doesn’t understand how to glaze, and automatically erases facets. Smoother and less jarring than my coarse shaptons. It seems to respond well to variable pressure, and actually I don’t mind it as a one step for light thinning jobs.

