Photo shows results of poor technique--Please Advise

Kitchen Knife Forums

Help Support Kitchen Knife Forums:

This site may earn a commission from merchant affiliate links, including eBay, Amazon, and others.

The Smith

Member
Joined
Feb 11, 2019
Messages
5
Reaction score
0
Location
California
rMccEO1.jpg


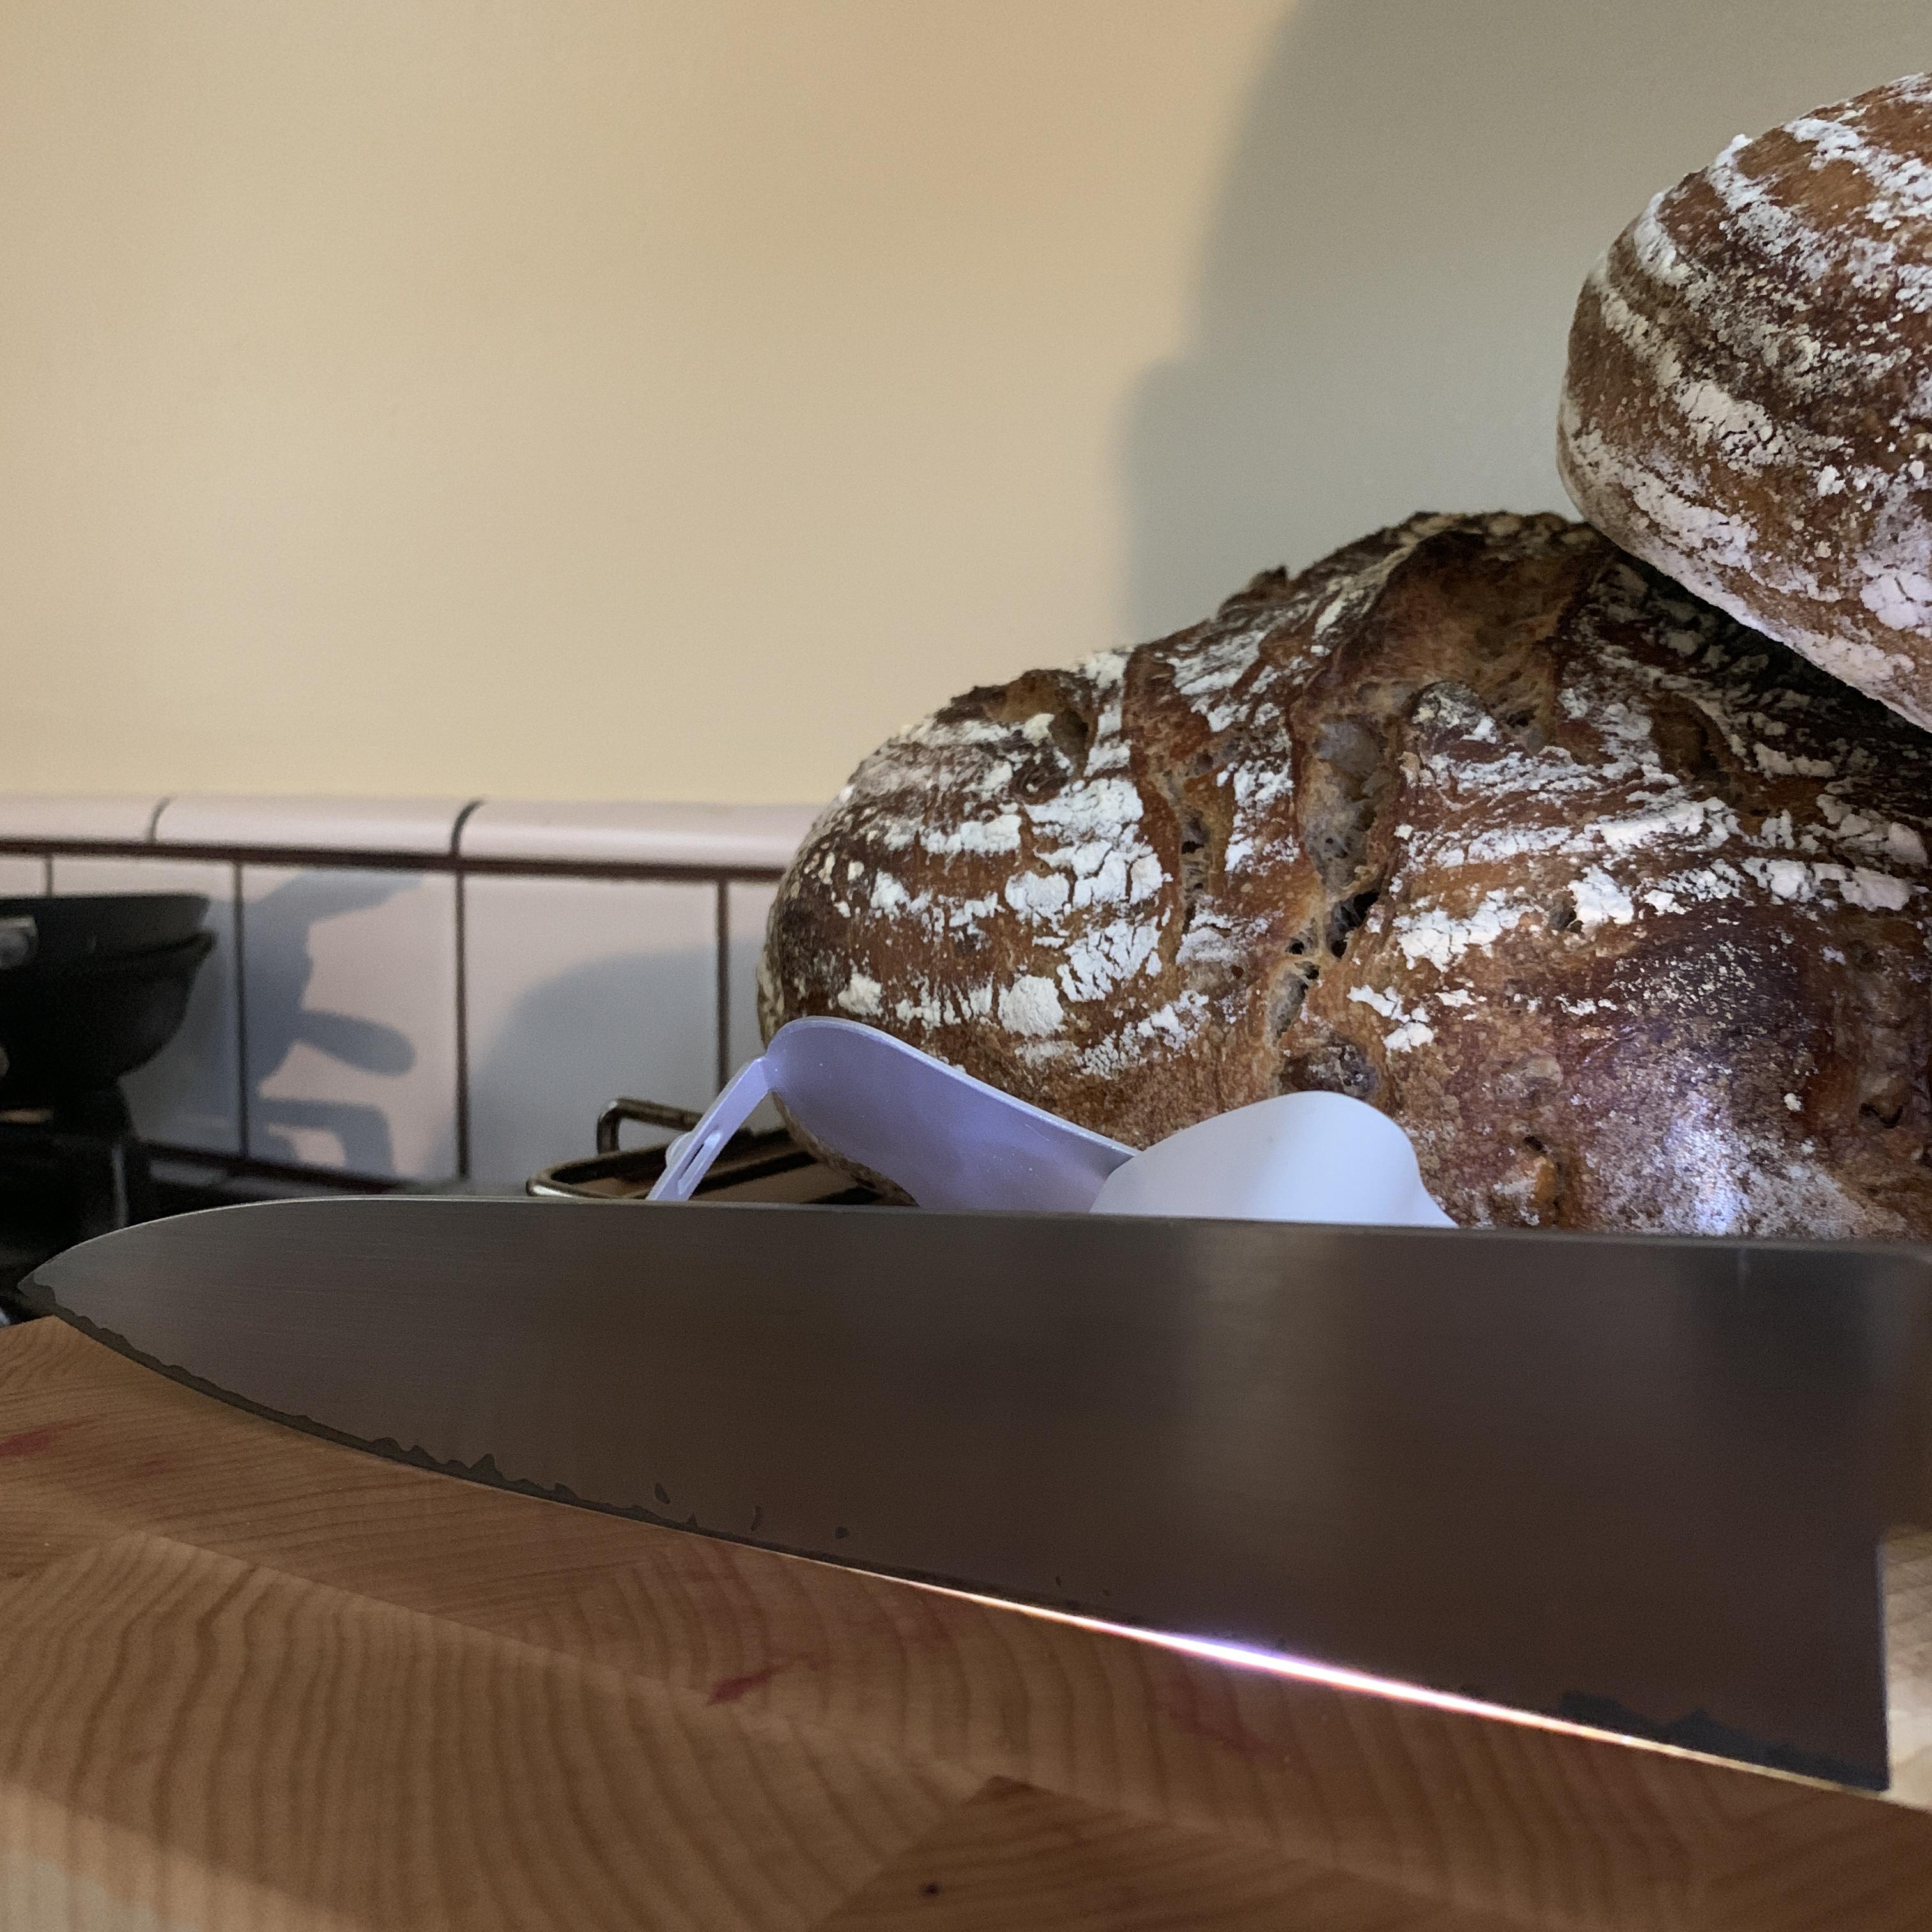
This is my Hiromoto gyuto 210. I've owned it for about 4-5 years, and It's my first quality Japanese knife. I sharpen it on a 1000-grit water stone. A couple months ago, I noticed the cutting edge was presenting some concavity toward the heel. For the photo, I placed a light source behind the knife so you can see the crack where the light is getting through.

I've watched 2-3 hours of Jon's instructional videos on sharpening over the past several years, but I've not been able to have someone watch me sharpen directly and offer a critique. I feel like my technique approximates his, but obviously, something is going wrong!

I recently purchased a Kochi gyuto 240mm, and I'd hate for the same thing to happen to it based on my poor technique.

Any suggestions?

Thanks in advance,

—Colin
 
This looks like damage from improper use of a honing rod. It could also be your sharpening technique. To fix it you will have to grind the edge down near the heel with the blade perpendicular to the surface of the stone until you eliminate that concavity. You can use a side of the stone if you don't want to dig a big gouge into the main face of your stone. This will make the edge thicker where you are removing material. So once you can pass the light test then you will need to thin the edge like Jon demonstrates in his videos. The easiest way to avoid this type of damage in the future is to make sure you are grinding down the edge evenly as you sharpen. You can use the magic marker trick to see exactly where you are removing material. You can also change your technique. If you are focusing on one section at a time, maybe try doing sweeping motions that sharpen along the entire length of the edge with each stroke. The most important thing is to continually monitor your progress and make sure you are carefully examining your knife before and after each sharpening session for any flaws that will impact performance.
 
Never used a honing rod on it. I used magic marker when I first started out; guess it's time to go back to square one and break the marker out.

Thanks, stringer.
 
@stringer How on earth does someone create a groove like that? It's difficult to tell scale in this photo. Is what's shown just the bevel (1–2 mm), or is this the side of a knife with a wide bevel?
 
Ah, OK, it all makes sense now, thanks! I was thinking that I was looking at the side of a knife :)
 
IMO. Best to reprofile the knife by grinding at a 45 degree angle on a coarse stone not perpendicular to the stone. This way you can use the actual surface of the stone as it is intended. This allows you to be more precise in your regrind as the rest of the edge is not inline with the stone. Once the desired profile is achieved, then thin the blade.
 
Ouch, i had this issue years ago when I started sharpening on my soft western chef knife. I had improper pressure on the hand holding the knife and spent too much time in the middle of the blade(obviously).

Thankfully its an easy fix. remove material from the edge until you have the shape you want. You can cut it out of paper/cardstock so you have a reference as youre thinning.

After you have the shape you want, get to thinning the blade and setting the new edge. Since this is a stainless clad, make sure you are keeping the carbon steel in the middle(the darker steel in your image, it wont be darker after sharpening though) I'm not sure about this knife, but usually a 50/50 grind is a safe bet but check wherever you got it, could easily be 70/30
 
Do you find it difficult to figure out when the edge is actually straight? Do you have to check it against a board occasionally, or does it turn out to be easy to tell as you're digging that track into the side of the stone?

I check my progress on the board every couple of minutes. Julienne a piece of bell pepper, if I get accordions then it needs more loving. If I can't fix it this way quickly then I take it to my 1x30 belt sander. I also use that groove to do tip sharpening/repair.
 
Are you holding the blade at right angles to the long axis of the stone, or at 45 degrees or less (blade in line with/more parallel to stone)? You should be at 45 degrees or less so that more of the blade is contacting the stone.

Is your stone flat? You should be flattening regularly with a diamond plate, or similar. Jon shows a flattening technique with hashes and diagonal pencil lines to check high and low spots on the stone.

It’s also possible you are not spending enough time with your finger tips directly over the heel, and instead concentrating just forward of it with the heel hanging off the stone.

Hope some of this helps.

J
 
looks like the result of inconsistent or uneven burr formation... you likely want to pay more attention to that once you repair
 
Are you holding the blade at right angles to the long axis of the stone, or at 45 degrees or less (blade in line with/more parallel to stone)? You should be at 45 degrees or less so that more of the blade is contacting the stone.

Is your stone flat? You should be flattening regularly with a diamond plate, or similar. Jon shows a flattening technique with hashes and diagonal pencil lines to check high and low spots on the stone.


J

Yes, I hold at about a 45° angle.

And, I just flattened my stone a couple months ago, but it was a bit dished. Could that be a contributing factor?
 
looks like the result of inconsistent or uneven burr formation... you likely want to pay more attention to that once you repair

I don’t understand how uneven burr formation could contribute to that concavity. Could you elaborate?

Thanks.
 
This is one of the most common things I have to fix on coworker's knives and vintage ebay finds. I use the side of a naniwa super stone. You can see the groove.

Is that a 220? You mentioned a 2k SS in a thread a couple of days ago -- but a 2k wouldn't be great for grinding edges straight like that, surely...
 
Is that a 220? You mentioned a 2k SS in a thread a couple of days ago -- but a 2k wouldn't be great for grinding edges straight like that, surely...

It's a 2k. Definitely not ideal. Mother is the necessity of invention or something. The first time I tried fixing something like this by sharpening perpendicular to a glass 500. That ripped big gouges in the stone. So I decided to use the edge of a stone instead. Most
of the rest of my stuff is shapton glass which isn't thick enough for such a strategy. And more expensive. I wouldn't necessarily recommend using a 2k super stone as the ideal. But at the same time the 2k super stone is the only thing I've ever used with this method. But I think any stone at least 20mm thick would work. Or even just a brick. Somebody breaks a tip and asks you to fix it, you make do with the tools you have available. I wouldn't recommend it if it didn't work. That particular stone has fixed dozens of broken tips and reverse bellies over the last 8 or 10 years.
Most recently yesterday on a global chef knife with a badly bent tip.
I'm not a professional or expert sharpener, but I'm a prolific amateur by necessity. Most people in professional kitchens don't know jack about maintaining their gear. I will say one thing. I beat the crap out of that super stone and it survives. It does glaze quick but it never dishes. So I just have to constantly refresh the cutting power. But if you do then it's almost as quick as glass 2000 while leaving a much more polished edge and bevel. I have other stuff available now, but I still use this method 90 % of the time.
 
I find the dressing stones Naniwa includes with Choseras actually make so much more sense with Super Stones than they do with the Chosera, with regards to refreshing the surface.
 
But I think any stone at least 20mm thick would work. Or even just a brick.
The brick strategy sounds good to me. A brick is something I can pick up from the discard pile at a building site or, if I insist, buy for a dollar or two. With major re-profiling like this, I have to completely re-establish the edge anyway, so there is no point in trying to preserve it and waste a lot of the substance of an expensive Japanese stone.

Burrfection (yes, go ahead, stone me) has a video where he did some major repairs on some concrete steps and a brick in his backyard. Makes sense to me. No expensive stones getting worn out, and no gunk to clean out of the drain of the sink.
 
Using a proper metal file to do this kind of work is the way to go, in my book. Much faster than abrasives and no gouging sharpening stones or one's patio. Assuming one has access to a file of relatively sufficient quality to deal with the blade's hardness.
 
... Assuming one has access to a file of relatively sufficient quality to deal with the blade's hardness....

Swiss files etc, are not suitable for this, unless you are talking special order stuff (very expensive).
 
You are probably looking at 30-45minutes or grinding to correct that and then sharpen/thin it. Could be more, could be less.
 
Oh yeah suitable stones for this task would be something like a 200-400 grit for the heavy lifting and then a 1k or 2k or so to smooth it out. Or if you have a diamond plate start with that. I think the shapton pro 220 is pretty much made for these tasks. Cheap and effective no nonsense stone.
 
It's a 2k. Definitely not ideal. Mother is the necessity of invention or something. The first time I tried fixing something like this by sharpening perpendicular to a glass 500. That ripped big gouges in the stone. So I decided to use the edge of a stone instead. Most
of the rest of my stuff is shapton glass which isn't thick enough for such a strategy. And more expensive. I wouldn't necessarily recommend using a 2k super stone as the ideal. But at the same time the 2k super stone is the only thing I've ever used with this method. But I think any stone at least 20mm thick would work. Or even just a brick. Somebody breaks a tip and asks you to fix it, you make do with the tools you have available. I wouldn't recommend it if it didn't work. That particular stone has fixed dozens of broken tips and reverse bellies over the last 8 or 10 years.
Most recently yesterday on a global chef knife with a badly bent tip.
I'm not a professional or expert sharpener, but I'm a prolific amateur by necessity. Most people in professional kitchens don't know jack about maintaining their gear. I will say one thing. I beat the crap out of that super stone and it survives. It does glaze quick but it never dishes. So I just have to constantly refresh the cutting power. But if you do then it's almost as quick as glass 2000 while leaving a much more polished edge and bevel. I have other stuff available now, but I still use this method 90 % of the time.

Very innovative method! I think I'm gonna try this out too next time I get a reversed on in to grind.
 
A file won't help much, it's likely not going to be enough harder than the knife....

What you are doing is not spending enough time at the heel and tip when sharpening, it takes a little thought while working to keep the grinding constant all along the edge. As you go back and forth you spend more time in the middle than the ends. You might want to start on one end and work to the other in overlapping strokes with two on the heel and tip each time. If you sharpen to the least palpable burr, you will notice the burr appears in the middle of the edge first unless you are doing a good job of keeping the grind even along the lenght.
 
I see high heels on knives all the time. It comes from improper heel sharpening. People pay more attention to tips, but the heel is part of the blade too. Of coarse full heel bolster knives cause this type of uneven grind. You must grind the heel so the back part of the knife is flat on the board. Then you will have to thin it some.

By burr he means that you must have a even burr heel to tip. If that last part of the heel is not getting sharpened you will not have a even burr. People have diff. techniques whatever works. This is how I teach heel sharpening. On one side of the blade start at the heel with the index finger of the handle hand firmly planted on the very back part of the heel. As the finger progression of the other hand moves along the blade the index finger of handle remains on the heel. This also helps to keep a steady spine for an even bevel heel to tip.

On the flip side the thumb of the handle hand is planted at the very back of the heel.

I show students a knife with a high heel and a bird beak tip. Almost none of the blade is on the board. Then I show a old knife that has correct sharpening and a even edge heel to tip. High heels some times come from the handle in the way at lower angles. They just skip the heel and start sharpening in front of it. (Jon talks about this where you have to go 90% on one side until the handle is out of the way.)
 
One alternative is to send it to somebody like Jon Broida to get it fixed...if you have a sentimental attachment to this knife and want to ensure it’s restored properly. However, if you don’t mind spending the time trying to fix it, you’ll learn more than the knife is worth...even if you screw it up.
 
Back
Top