Rambling thoughts on gyuto profiles

Kitchen Knife Forums

Help Support Kitchen Knife Forums:

This site may earn a commission from merchant affiliate links, including eBay, Amazon, and others.
Curious on why Sukenari is a 'personal favorite' of your's? I've never used one, but have handled a few in stores. What made you favor Sukenari over some of the other classic profiles like Mas KS, Shig, Watanabe, etc.
It's more that I bought a couple of them which subsequently got me into knife making. Less to do with the profile itself.
 
It seems like you all made a lot of progress with mapping the side profile of a knife. How do the cross-sectional profiles (spine to edge) vary along the length of a knife? I suspect this varies by maker but I've always wondered how, for example, the S-grind profile terminates at the tip.

Looking at the choil shot is evident but I've found it harder to look at a tip and understand the grind. Fingers work decently well for the middle of the blade.
 
A good sense of touch will be useful up to about the belly/fwd sweet spot,
after that is usually hard to discern as distal taper/thin-ness approach flat grind

The sticktion issue is alot less directly at the tip, In my experience
 
Let us know how it turns out! I'd be very interested to see how it works.
I folded a piece of gridded paper so that it would be perpendicular to the surface of the blade. I then used Snapseed (on my phone) to correct for perspective. Past a certain angle, the sharpie isn't really visible, but it's not too bad. The perspective makes that somewhat moot, except that more pixels in the curve are desirable. The sharpie line is normal to the edge curve (ie, perpendicular to the tangent).

I think a similar spreadsheet might be useful, in that we can look at a few things:

*Height of convexity (ie, is there a flat ground area near the spine
*Change in convexity from spine to edge
*Width, depth of concavity
*Radius of concavity

Or similar ideas.

I don't have anything particular interesting in grind, but I do have a Tosa knife (super thick at the spine) with a bit of upper concavity that I'd like to check out. That'll be a good extreme case for the technique. I'm concerned that the crepe texture on my painters' tape will interfere.
P_20190330_110106-02.jpeg
 
Last edited:
Interesting... I wonder how accurate that is. My head wont stop telling me that the perspective is skewed, and that the picture is no different from this kind of ruler picture (stolen from XooMG):
CMweTLn.jpg

How would you account for the angle at the edge? So for example, on a flat grind knife where the line in your picture would come out completely straight, how would you find out thick the spine is using your method?
 
This is an entertaining discussion for someone who can easily go off the rails with over-analysis. :D

I agree with what seem to be the general conclusions about edge curves. When I profile a new kitchen blade, I continually check to make sure that rocking push cuts don't catch the tip too hard on rocking push-cuts. Of course that's all modulo the height of my workshop surfaces. o_O

And while I've made quite a number of knives from identical CAD drawings (bezier curves), they're all a tiny bit different in the end since they're all made by hand.

In factory knives, things like little flat sections of edge near the tip are well within re-sharpening reach for the home user. Just put it on your diamond hone before going back to whatever scented waterstone ritual you use for regular touch-up.

Re: belt-grinder ruination
I have nightmares about that sort of thing. My condolences.

Between this and another thread on santoku profiles, I wanted to mention my thoughts on spine/nose shape. I learned the hard way (surely because of bad technique, but that's probably quite common...) that the in-between profile between "pointy" gyuto and "severely Roman" santoku noses is a potential risk for cutting the support hand, if you're trying to cut through something tough, like a large melon or squash. If you are used to a pointy or K-tip profile, and put a bunch of pressure on the nose with your weak hand, you risk sliding down the nose and cutting your hand with the tip. I'm sure you don't need to ask how I learned this on the very first kitchen knife experiment I made... I don't know what that safety angle/curve is exactly, but I know it's dangerous when I see it.

Re: modeling existing blades - difficult to re-scan that stuff precisely, and even harder to reproduce precisely in 3D steel unless your CAM'ing your blades. Some empirical measurements with a best-fit curve might be an alternate approach. Sometimes you need to get the technology out of the way (says the computer scientist). Here's my transistor-free way of measuring thickness at various points on the blade.

Hmmm, looks like 0.110" to me:

IMG_20190402_091649_1-small.jpg
 
My head wont stop telling me that the perspective is skewed, and that the picture is no different from this kind of ruler picture (stolen from XooMG):

The primary thing we have going for is the straight line (when viewed from above) - which allows us apply the principles of plane geometry and orthographic projection. If the shadow on XooMG is straight we could actually use that - if we could see the ruler markings to remove the perspective distortion. However, I did try some experiments with a ruler on the back side of my deba. I found that the light diffracted enough to make things fairly inaccurate, but it would be interesting to try a photo lot more like that one. The big issue is not knowing whether that curve lies on a plane perpendicular to the blade.

How would you account for the angle at the edge? So for example, on a flat grind knife where the line in your picture would come out completely straight, how would you find out thick the spine is using your method?

You would have to measure it - for me, that's calipers or a mic like daizee mentioned but I know not everyone has them. Perhaps an additional photo of the spine with gridded paper or a ruler could provide sufficient accuracy - although rounded spines make things harder.

Essentially, we have a curve from each side, but they must be placed using an assumed thickness of zero at the very edge, and a measured spine thickness.

There's also the issue of how we define compound grinds (with non-smooth transitions) - perhaps choosing 1,2, or 3 segments would do the trick. I've looked at some graph digitizing software, but I think there's too much image processing in prep.

Re: modeling existing blades - difficult to re-scan that stuff precisely, and even harder to reproduce precisely in 3D steel unless your CAM'ing your blades. Some empirical measurements with a best-fit curve might be an alternate approach. Sometimes you need to get the technology out of the way (says the computer scientist). Here's my transistor-free way of measuring thickness at various points on the blade.

Hmmm, looks like 0.110" to me:

IMG_20190402_091649_1-small.jpg

Yeah, and that's something I'm happy to do also - but I'd like to come up with something simple wherein a knife enthusiast who isn't also metrology enthusiast can simply snap a couple pictures, tweak them a little, and share.
 
Processing images a bit further, I thought of a couple further considerations:
1) A contour gauge has no perspective to correct, but could scratch cladding or chip an edge.
2) The luminosity of a laser would be nice, because it would really stand out in the image. You could drop the exposure way down in a dim room. With a tripod, you could take two identical pictures, except the laser would be on for one - then subtract the laserless image to leave only the laser (although that's probably unnecessary).
 
If you darken the room, you can usually segment out a laser pretty easily with a simple intensity threshold, or add spectral intensity for more reliability. But of course you run into issues using a laser on a highly specular surface like polished steel, which will be complicated by per-knife variations in finish direction or general scratched-uppiness. I would be concerned that you wouldn't be able to reduce the uncertainty in the laser segmentation below the threshold of accuracy you would like to achieve from the system.

The bugaboo in most computer vision systems is calibration. For many purposes, output that "looks good" is the goal, which is to say photos, basic structure with images wrapped on, mosaics, etc. But if you want to do actual metrology on an object, you have to control the setup substantially, account for camera distortion (possibly automatic in today's phone software? I haven't checked this decade), lighting, surrounding environment, etc.

Using a grid for calibration can work, if your segmentation of the grid can be precise enough to allow you to discern thousandths of an inch (pardon my units) from pixels - but resolution will be dependent on depth, remember, so the further the incident surface from the camera, the larger an angle subtended by any given pixel. You might be able to calculate that precision to learn within what depth of field you can expect a useful measurement. But if you're taking measurements across the image from left to right, you may also have a variation in expected precision. (again, variation per-camera)

There are similar algorithms that work with a moving shadow across a scene to get structure instead of a laser - I think the step function of the shadow on the shiny surface would be more precise, as demonstrated above, but again, the user will have to control the lighting. Not everybody "sees" what they're actually seeing, and that might take some training per-user.

Don't get me wrong, I think this is a very cool project which should be pursued! But representing it as "simple" for the end-user might be a stretch. ;)

While I did show a picture of a micrometer earlier, which I wouldn't expect most people to have (I have lots, but New England is littered with good used tools at flea markets), a good-enough set of ~$35 dial calipers is well within reach of any enthusiast willing to spend good money on fancy knives, and arguably a very informative accessory.
 
Agree with alot of the above...

raw digital capture files aren't inherently all that sharp and using SW layer edge-contrast filters
creates all kinds of problems....and this is assuming the distortion, chromatic abeerition,
and specular highlights haven't created their own issues...but all of that is par for the course
whentryingt o capture high-contrast acute-angle shots like choil shots and /or
\profile shots of thin-geoemtry knifes under artificial light

Oh, and then there is drop-shadow effects along profile edges..

:(
 
Yeah, computer vision goes a bit further than I'd intended. And as you say, "simple" is perhaps an exaggeration. My thought of workflow would be:
  • Set up line and reference grid
  • Capture picture
  • Manually correct perspective in an image editor
  • Draw spline manually, similar to the side profile method.
As I alluded to earlier, splines won't really handle sharp cusps of compound grinds, so multiple spline segments are in order for certain types of grind.

It may be that measuring is actually simpler, and more intuitive; however, I think that a depth gauge measuring down from a bridge of sorts (think parallels across a pair of blocks) would handle asymmetrical shapes better. However, it requires layout of the measurement points, and recording each pair - which could be a bit fiddly. Ideally, it'd be nice to have data cables logging on two axis simultaneously to create data pairs as you drag the gauge - in essence, a digitizer/CMM. I'm not aware of any affordable ready-to-go options, though.

Perhaps the more accurate point is that regardless of fiddlyness, I'd like something that's easy for people to contribute to. If people were willing to draw a line, place a card, and take a photo I'd happily process them.

That's assuming, of course, that the method is fairly accurate. My plan is to take my photos, stick the curves together, and check the thickness against real life. I'll also check the concavity depth of the ura on by deba to see how accurately that works. My hope is that it's accurate enough in the area of interest.

As to distortion - It's my understanding that modern smartphones do have lens profiles built in. Because the lenses aren't interchangeable, that won't vary over the life of the device. That's a upside over using my "real" camera, because I use vintage MF lenses, so I'd have to download/create the profiles for postprocessing. I did however notice a small amount of remaining barrel distortion in the grid spacing from my phone.
 
w/jpeg... you tend to see alot of low-information, high-contrast ege zones
(ie w/ heavy jpeg artifacting)
 
You guys are really going deep here.
Just a thought that rose. I don't intend to assume anyone is actually trying to copy, lets just play with the thought.
What is the purpose of this kind of detail precision mapping? Repeatability? Because imo that's not going to happen with any modern equipment actually. I don't believe even in this day, machines can work this hard steel accurately and consistently, as good as handground. Everything connects and impacts, for example the before and after hardening, if the steel moves in the process, adjusting profile and grind constantly throughout grinding and finishing.
So if someone (factory or handmade doesnt matter here) is producing a pretty good knife consistently. In order to be able to really repeat it, you need their full process, every trick and priorities they know, their skills, and a close study of all their tools. It's the interesting nature of hardened steel knives I think
 
Last edited:
What is the purpose of this kind of detail precision mapping? Repeatability? Because imo that's not going to happen with any modern equipment actually. I don't believe even in this day, machines can work this hard steel accurately and consistently, as good as handground. Everything connects and impacts, for example the before and after hardening, if the steel moves in the process, adjusting profile and grind constantly throughout grinding and finishing.
So if someone (factory or handmade doesnt matter here) is producing a pretty good knife consistently. In order to be able to really repeat it, you need their full process, every trick and priorities they know, their skills, and a close study of all their tools. It's the interesting nature of hardened steel knives I think

Totally agreed. The other thing I find interesting which happens here a bunch is when somebody posts measurements of one specific example of a knife and everybody basically thinks that if they buy one it will be the same. For sure there will probably be general trends when the same bladesmith and same sharpener work on a knife (in the case of Japanese knives), but I doubt the measurements will always be the same. That is one of the advantages of buying from a maker like you (Robin Dalman) because you test the performance of each knife individually and adjust it until you find it to perform the way you intend.
 
What a thread. Thanks to everybody for contributing. FWIW when I joined this forum I was told there would be no math.

I find particularly interesting are some thoughts in the earlier pages on weight distribution and it’s relation to profile. It has helped me put some of my preferences in perspective.

It reminds me of a 270mm Kato I had. With a hefty knife you want to use the weight to your advantage. This knife just naturally wanted to fall exactly where the profile made the least useful board contact. It made you fight the substantial weight of the knife with every swing. It had such a unique spine to edge geo that I hadn’t even gone through the trouble of thinking through how to potentially add a faux full tang custom handle and even had Delbert Ealy lined up to make it but decided just to sell instead. Maybe the worst knife I have ever used for weight distribution in relation to profile.

I appreciate the comments from makers regarding ways to address weight distribution without changing edge profile especially spine profile and distal taper. It has helped me understand why the particular characteristics of my favorites make them my favorites and hard to beat for my specific and quirky tastes.
 
Here's an interesting concept...

Over in the world of swords there's a highly regarded smith by the name of Peter Johnsson who likes to map out some points of interest under the blanket name of 'Blade Dynamics'. We all know of the balancing point, but there is also the pivot (rotational) points and vibrational nodes.
He can explain it better than I can, you can find it at the 48:15 mark of the following video. The relevant part takes about 10 minutes, but the whole video is pretty good.

So I'm wondering, do you guys think such points of interest apply to our knives?

PiovtsNodesAltFormat.png

MeasuredPoints-bis.png
 
Last edited:
mass and distance and rotational forces
uh oh...:)
here come newton meters
 
its an intersting question thinking about...
option 1) lever arms and force application (torque)
option 2) vs lever arms and mass distribution (balance)

what is more relevant to end users?

IMHO many of people use the 'balance' concept to describe a knife with good, neutral ergonomics.
 
Very interesting stuff…
I don’t have anything to contribute beyond a question:
I wonder how the fact that the overall shape of a knife shape is asymmetrical (i.e. basically trapezoid with a tang) as compared to a sword which is symmetrical (i.e. cross-shaped) might matter?
 
I think it certainly could be a factor in the pleasure and ergonomics of using a knife - likely there's a role of balance and vibrational nodes when it comes to how a knife feels on the board, especially when chopping rapidly.
 
I've never seen anyone mention it yet, but it's kind of obvious. Longer knives need less belly.

As you all know, to stop the tip of a knife from digging into the cutting board during a rock-chop or a push/thrust cut, you need to have the edge sweep up at the tip.
To get the same height of handle lift, the belly on a short knife needs to be curvier than on a longer knife.

mjbuvH6.png

This helps to explain why we can get away with flatter profiles and a lower tip on longer knives.
mse9nE7l.jpg

aIMG_9413_740x.jpg
 
Salty had a video about ergonomics, where a longer knife needs less wrist angle to get over product than a short one. Just talking sides of a right triangle here. Longer hypotenuse with equal opposite side = smaller internal angle.

Forget Newton meters, here come sines. Where's Ian?
 
There's definitely a sweet spot for springiness. I often hear complaints about blades being too flexible, but I think the reverse (a clunky thick tip) tends to be put up with more often.
__________________

Okay, here is something that hasn't been mentioned yet - I like to call it "the KS effect".
It turns out that the choil (or better yet, the emoto) - with all other things being equal - has a significant effect on how the overall knife behaves and can actually nullify a precise measurement of the heel height.
Take a look at this example:
xC4Wypr.png

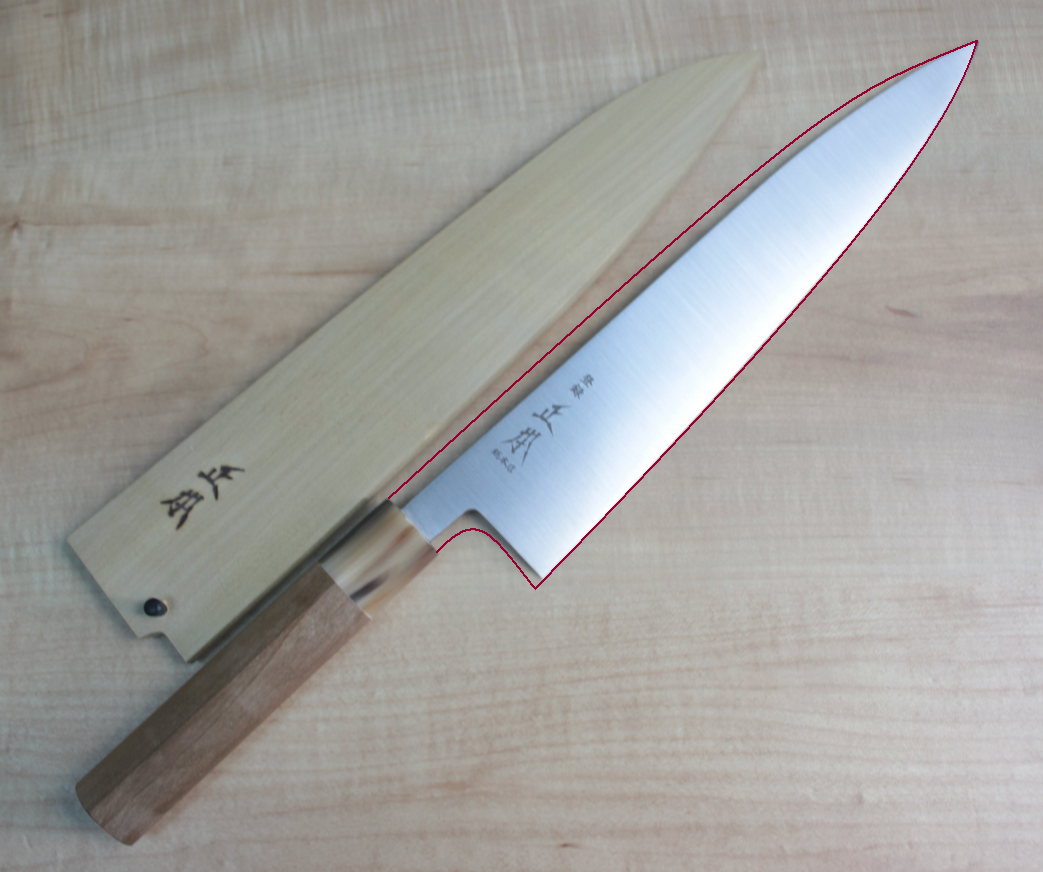
These two profiles are identical in terms of the properties we've talked about so far. Blade shape, flat spot, the handle/spine angle relative to the board... all of these essentially duplicated. If we were to take each one and measure the height of the knife at the heel, the numbers would come out exactly the same. However it wouldn't give a good indication of how tall each knife feels on the board, as the shape of the emoto has caused the one on the left to be a "shorter" knife, while the one on the right is "taller". It's a difference of only a few millimeters, but it's enough to feel during use.

I first noticed this while looking closely at the Masamoto KS to work out why the blade looks so thin and slender, and I soon came to realize that their style of emoto raises the handle off the spine and gives them more space to work with. Other styles of emoto can cause handles to rest closer to the board, despite what an equivalent heel measurement might indicate.
Compare the following image to the one at the top of the thread - Could it be considered a KS clone? :p
sKQ93TM.png
This is by far one of the most interesting posts ever in the knife community. Anyway, I wanted to ask you if there is such a thing as a santokuish gyuto like the takedas, with the masamoto KS style of emoto? I always have liked the masamoto KS profile a lot but I do find the 270 is harder to wield when it comes to precision cutting than other knives, after reading your post it makes me think that the closer the edge can get while holding the knife in the most natural position (that would be without having to lift your elbow higher in order to get the point closer to the board) the better the knife performs in terms of control.
 
Anyway, I wanted to ask you if there is such a thing as a santokuish gyuto like the takedas, with the masamoto KS style of emoto?
What about Watanabe? I wouldn't call his gyutos 'santokuish', but they have sort of a bullnose tip and no machi. They are widely considered to cut very well and might give you what you are looking for.
 
Back
Top