


So,
this review was long in the pipeline, but finally here it comes. Since the ordering and production of this knife was non negligible part of the total experience, please bear with me with somewhat long-ish introduction. I am really trying to tell the whole story - all things that I found excellent as well as those that could use an improvement.
Background
I came across the webpage of Blenheimforge pretty much by accident sometimes in November 2015, but got immediately attracted by the knives these guys made. Run by 3 young guys who learned all the stuff pretty much by themselves and finally opened a shop really spoke to me and I thought that this could be just the right place for my next custom knife. I had a rough idea in mind for a 'travel kitchen knife' in mind since a while and Blenheimforge looked like the right place to go forward with it. Few emails later everything was on a good way - we agreed to continue after Christmas as they had a lot of orders to fulfil and I was not in a hurry. In the mean time we continued on discussing the details (I provided my own design/profile) and I appreciated a lot all the information that Jon shared with me - really helped me to understand the process better and also to adjust to it. It was very apparent that Jon also appreciated my interest in understanding the process.
Who is Blenheimforge
There is not too much information out there even though some articles are linked to their webpage. I was curios myself and have several questions to Jon on this topic and I just though that it would be best to quote (with Jon's permission) a few of the replies here (and later in the text) as I think it allows for a better perspective.
Q: What was for you guys the starting motivation to become blade smiths?
A: "Our interest started with a few experiments with basic pattern welding about 3 years ago- using the workshop that James used to work in for a steel fabrication company (now our workshop). We had an initial success- despite having no idea what we were doing! followed by endless repeated failures!"
Q: Did you learn/develop the technique all by yourself or did some of you work with some other knifemaker?
A: "We are completely self taught- this was a long, ofter very frustrating, and we are still learning every day."
Q: When did you start with knifemaking and since when do you sell knives?
A: "Initially with a forge in our garden and belt sanders in our bed rooms! And started selling our knives about 2 years ago, after taking over the workshop, mainly to friends or people who lived nearby under the understanding that if there was something wrong with the blade we would be happy to remake it as we were looking for feed back as much as anything else. For a year now all 3 of us have been managing to go full time as blade smiths and make JUST enough to live on."
But now let's get back the the knife in question.
My designs:
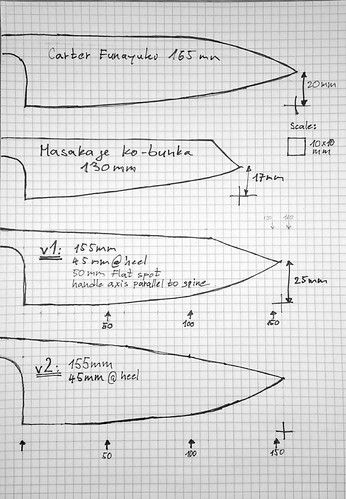
I went with a relatively tall (45mm) and short (150 - 155) blade that had a usable flat spot, but then enough belly to also work well as a slicer (I learned that my 165 Yoshikane Hakata was not the best to slice meat because of its flat profile) - in other words a knife that would perform reasonably well on wide range of tasks. A jack of all trades, so to speak. I used my Carter funayuki and Masakage Koishi as starting point. From the 2 designs below both sides found the v1 more suitable.
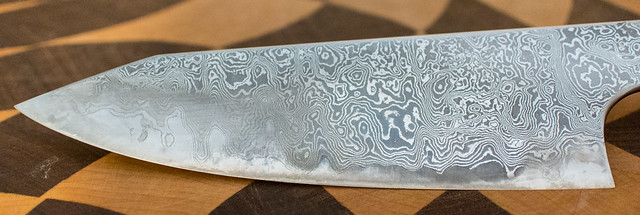
The knife was finally forged by the end of January and reached me in mid-February. I originally planned to go with plain iron cladding (my logic was: travel knife = keep the price down), but finally decided to go with damascus.The reasons to go with damascus (iron & nickel) were technical - this is what I learned from Jon:
A: "There's a few differences between the folded iron cladding and the Damascus. The most significant is due to a phenomena called carbon migration. In a nutshell, when a laminated billet is forged, the heat causes the carbon in the steel to migrate from the high carbon core to the lower carbon cladding. This means that if a laminated blade is forged very thin the core will end up softer and the cladding harder, so the benefits of a laminated blade are reduced. Conversely if the blade is forged thick and then ground thin, a large amount of the core steel is exposed and the end result is a less durable blade.
White our Damascus cladding this is not an issue since the nickel acts as a buffer between the iron and the core steel. In fact, with careful attention to the forging conditions, the core steel in these blades is actually gains carbon during forging.
Furthermore, we build the Damascus billets ourselves which means each billet is Taylor made for the final blade that will be produced with the steel, as opposed to the folded iron billets which are ideal dimensions for our stock santoku and Nakiri but have mixed results on other profiles."
But the knife arrived and here are the ...
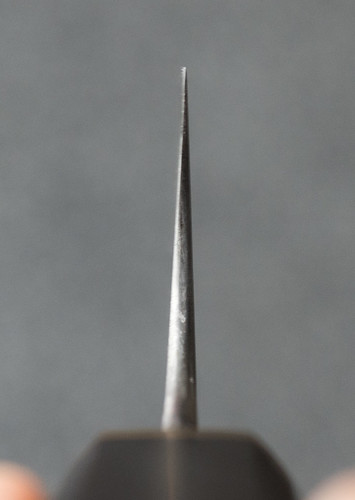
First impressions
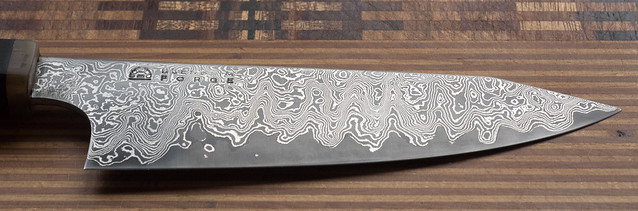
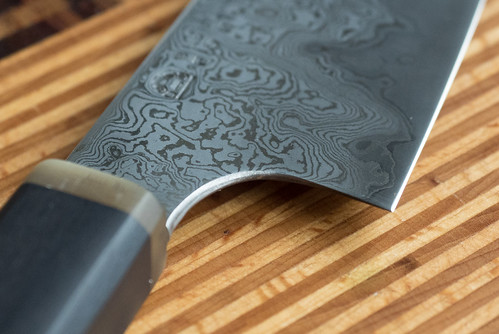
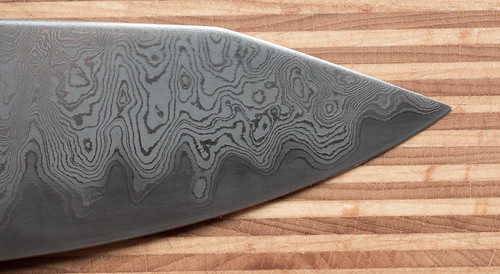
- knife looks really nice")
- rounded spine and choil, very comfortable to hold
- blade thinly ground
- very nice handle (I learned later that it is bog oak) - slightly thinner than a traditional WA handle would be, but sits well in hand.
- little heavier than I naively expected - part of the reason was the handle material which is denser than normal wood. Weight balance neutral. Knife feels very nimble.
Now for some photos:


Dimensions
- heel to tip: 147 mm
- height at the heel: 43 mm
- thickness at the handle: 3.7 mm
- thickness at the heel: 2.8 mm
- thickness 1/2 towards the tip: 2.2 mm
- thickness 1cm from the tip: 0.8 mm
- weight: 125g
Performance - part I
Already the very first cuts let me scratching my head at first - the edge was shaving sharp, but the knife gave me surprising amount of resistance when cutting most vegetables. Using my brand-new digital calliper revealed the truth - the knife was a little too thick behind the edge. Once I was at it I measured several of my knives - at 10 mm from the edge this knife was as thin as my thinned Carter - about 1.0 - 1.1 mm, but just behind the edge (some 2 - 3 mm from the edge) it was at 0.35 mm, where most of my knives were around 0.1 - 0.15.
Information from Jon when I asked about the grind (we had a much longer discussion on this topic that may continue in the future):
A: "... we have just switched from grinding the blades on a belt grinder to a water stone wheel and are adjusting to the new grinding method."
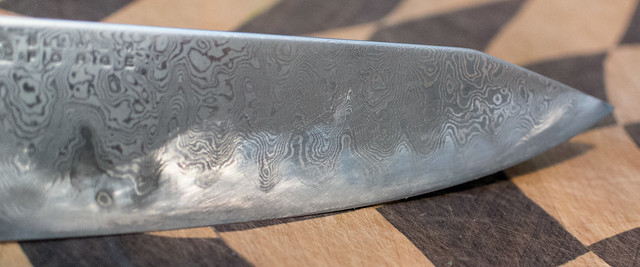
So I have decided to thin the knife up to about 5-7 mm behind the edge. That was an interesting experience - I was thinning a knife for the first time. That revealed a few details that would have otherwise remained hidden. The grind of the knife was slightly asymmetric - more flat on the left side and more convex on the right side. Once I realised that, I concentrated mostly on the right side. Second - there was a shallow long low spot few cm from the heel on the left side of the blade. Once I 'discovered' it I measured it with the calliper and to my relief learned that it really was not a problem. Also - the cutting edge was not perfectly straight (the spine however was) - I was able to correct that just with my hands (it really was only some 2 mm - I had to use a gauge to actually be able to see it). I would have not noticed it, but when I started the thinning the left (rather flat ground) side, I was suddenly getting scratches high up the blade face and this was the reason.
This is how the knife looked after the thinning (sorry Jon)
And a choil shot - from left to right: Carter KU funayuki (thinned by Greg), Blenheimforge (thinned), Kochi Santoku
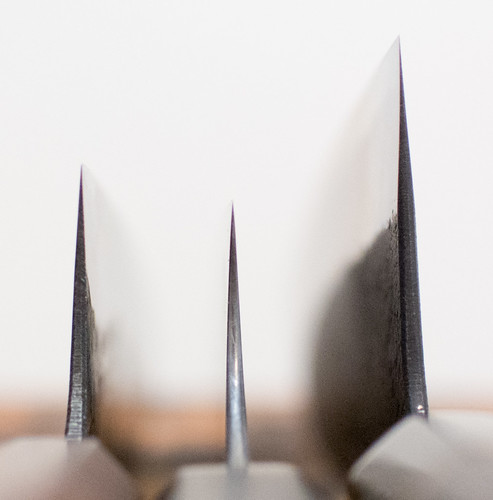
And one more - left to right: Carter KU funayuki (thinned by Greg), Yoshikane SKD Hakata, Blenheimforge (thinned)

Performace - part II
Anyhow - after about 1 hour on JNS 300 stone (which did incredible job and basically did not dish at all - I am super impressed - well done Maxim!) I had the knife where I wanted it to be. I have sharpened the blade with Gesshin 2000 and followed up with Gesshin synthetic natural. And wonder happened.
The knife now cuts extremely well - the tip go through onions without any resistance at all. Chopping of vegetables is a joy. Of course - that slight asymmetry in grind largely remained (as it takes place further up the face of the blade) - once the blade behind the edge was thinned running with two fingers from the spine to the edge would let you feel it. I did not find it to be a problem though. On one occasion I noticed a slight steering - when I was slicing halved butter squash.
Making a relative comparison the knife cuts very close to my Carter and does better on hard vegetables then my Yoshikane SKD Hakata.
Since I was impressed on how well the core steel handled very acute angle (after thinning there was very little material left behind the edge) and after I shared that impression with Jon he answered:
A: "Its good to know that the edge preformed well even after thinning, your blade was one of the last blades we heat treated using the "traditional" method- relying on the colour of the steel to gauge the temperatures required for the various stages of heat treat. We have since moved on to using an electronically controlled heat treating furnace- as much for efficiency as anything else (no more waiting until it gets dark before we can heat treat!). ... yes the heat treat was a real nightmare to learn. We've destroyed close to a thousand blades figuring out the right way to do it. I think that we enjoyed a privilege that is not available to most japanese makers- the ability to learn stuff on our own time and to experiment."
I talked to Jon about the grind, it seemed that they aim for rather flat grind where I expressed opinion that certain amount of convexity is needed for optimal performace:
A:" This is very useful stuff for us going forward as we are constantly fine tuning our process especially with regards to grinding the blades. We've recently switched to grinding on a large rotating water stone as opposed to a belt grinder, and this results in an initial concave grind that then has to be flattened. This is in contrast to the grind from the belt sander that produces a flat grind (if done properly) which is then convexed while polishing."
Refinishing
However - there was still work to be done. The thinning left obvious marks on the blade and really called me to give the knife a little more care. My first quick attempt was to polish the blade with small piece of cloth and collected stone dust - that did decrease the contrast of the scratches, but did not give the finish I wanted. I will give the knife a more thorough finish at later stage (just ordering some fine grit sandpaper at the moment). I will add photos once that happens.
Summary
Even though not everything was perfect, I really like the knife and I enjoyed the process of it being made - in particular the exchange I had with Jon. I am glad I could support young, motivated group of people who were joy to work with and listened when I had a question or a comment (and Jon knows that I had plenty of both).
I would like to stress - even though guys from Blenheimforge are no 17th generation bladesmiths just yet - they are doing the effort of improving and learning new skills (their first powerhammer was just delivered), and they are very open to suggestions, questions and advice. That together with their energy and persistence really puts them on the right track to become master bladesmiths one day.
Already today Jon and his friends and Blenheimforge make knives that (in my case with a little effort on my side) perform really well, have their own unique character and are definitely worth a try.
Thanks to Jon for following up on all my questions and putting up with my 'advices' - both of which were plentiful :wink:
Matus
****
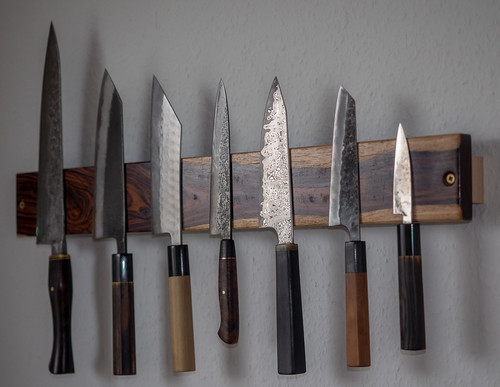
Looks good on magnetic holder (here before thinning)
this review was long in the pipeline, but finally here it comes. Since the ordering and production of this knife was non negligible part of the total experience, please bear with me with somewhat long-ish introduction. I am really trying to tell the whole story - all things that I found excellent as well as those that could use an improvement.
Background
I came across the webpage of Blenheimforge pretty much by accident sometimes in November 2015, but got immediately attracted by the knives these guys made. Run by 3 young guys who learned all the stuff pretty much by themselves and finally opened a shop really spoke to me and I thought that this could be just the right place for my next custom knife. I had a rough idea in mind for a 'travel kitchen knife' in mind since a while and Blenheimforge looked like the right place to go forward with it. Few emails later everything was on a good way - we agreed to continue after Christmas as they had a lot of orders to fulfil and I was not in a hurry. In the mean time we continued on discussing the details (I provided my own design/profile) and I appreciated a lot all the information that Jon shared with me - really helped me to understand the process better and also to adjust to it. It was very apparent that Jon also appreciated my interest in understanding the process.
Who is Blenheimforge
There is not too much information out there even though some articles are linked to their webpage. I was curios myself and have several questions to Jon on this topic and I just though that it would be best to quote (with Jon's permission) a few of the replies here (and later in the text) as I think it allows for a better perspective.
Q: What was for you guys the starting motivation to become blade smiths?
A: "Our interest started with a few experiments with basic pattern welding about 3 years ago- using the workshop that James used to work in for a steel fabrication company (now our workshop). We had an initial success- despite having no idea what we were doing! followed by endless repeated failures!"
Q: Did you learn/develop the technique all by yourself or did some of you work with some other knifemaker?
A: "We are completely self taught- this was a long, ofter very frustrating, and we are still learning every day."
Q: When did you start with knifemaking and since when do you sell knives?
A: "Initially with a forge in our garden and belt sanders in our bed rooms! And started selling our knives about 2 years ago, after taking over the workshop, mainly to friends or people who lived nearby under the understanding that if there was something wrong with the blade we would be happy to remake it as we were looking for feed back as much as anything else. For a year now all 3 of us have been managing to go full time as blade smiths and make JUST enough to live on."
But now let's get back the the knife in question.
My designs:
I went with a relatively tall (45mm) and short (150 - 155) blade that had a usable flat spot, but then enough belly to also work well as a slicer (I learned that my 165 Yoshikane Hakata was not the best to slice meat because of its flat profile) - in other words a knife that would perform reasonably well on wide range of tasks. A jack of all trades, so to speak. I used my Carter funayuki and Masakage Koishi as starting point. From the 2 designs below both sides found the v1 more suitable.
The knife was finally forged by the end of January and reached me in mid-February. I originally planned to go with plain iron cladding (my logic was: travel knife = keep the price down), but finally decided to go with damascus.The reasons to go with damascus (iron & nickel) were technical - this is what I learned from Jon:
A: "There's a few differences between the folded iron cladding and the Damascus. The most significant is due to a phenomena called carbon migration. In a nutshell, when a laminated billet is forged, the heat causes the carbon in the steel to migrate from the high carbon core to the lower carbon cladding. This means that if a laminated blade is forged very thin the core will end up softer and the cladding harder, so the benefits of a laminated blade are reduced. Conversely if the blade is forged thick and then ground thin, a large amount of the core steel is exposed and the end result is a less durable blade.
White our Damascus cladding this is not an issue since the nickel acts as a buffer between the iron and the core steel. In fact, with careful attention to the forging conditions, the core steel in these blades is actually gains carbon during forging.
Furthermore, we build the Damascus billets ourselves which means each billet is Taylor made for the final blade that will be produced with the steel, as opposed to the folded iron billets which are ideal dimensions for our stock santoku and Nakiri but have mixed results on other profiles."
But the knife arrived and here are the ...
First impressions
- knife looks really nice
- rounded spine and choil, very comfortable to hold
- blade thinly ground
- very nice handle (I learned later that it is bog oak) - slightly thinner than a traditional WA handle would be, but sits well in hand.
- little heavier than I naively expected - part of the reason was the handle material which is denser than normal wood. Weight balance neutral. Knife feels very nimble.
Now for some photos:
Dimensions
- heel to tip: 147 mm
- height at the heel: 43 mm
- thickness at the handle: 3.7 mm
- thickness at the heel: 2.8 mm
- thickness 1/2 towards the tip: 2.2 mm
- thickness 1cm from the tip: 0.8 mm
- weight: 125g
Performance - part I
Already the very first cuts let me scratching my head at first - the edge was shaving sharp, but the knife gave me surprising amount of resistance when cutting most vegetables. Using my brand-new digital calliper revealed the truth - the knife was a little too thick behind the edge. Once I was at it I measured several of my knives - at 10 mm from the edge this knife was as thin as my thinned Carter - about 1.0 - 1.1 mm, but just behind the edge (some 2 - 3 mm from the edge) it was at 0.35 mm, where most of my knives were around 0.1 - 0.15.
Information from Jon when I asked about the grind (we had a much longer discussion on this topic that may continue in the future):
A: "... we have just switched from grinding the blades on a belt grinder to a water stone wheel and are adjusting to the new grinding method."
So I have decided to thin the knife up to about 5-7 mm behind the edge. That was an interesting experience - I was thinning a knife for the first time. That revealed a few details that would have otherwise remained hidden. The grind of the knife was slightly asymmetric - more flat on the left side and more convex on the right side. Once I realised that, I concentrated mostly on the right side. Second - there was a shallow long low spot few cm from the heel on the left side of the blade. Once I 'discovered' it I measured it with the calliper and to my relief learned that it really was not a problem. Also - the cutting edge was not perfectly straight (the spine however was) - I was able to correct that just with my hands (it really was only some 2 mm - I had to use a gauge to actually be able to see it). I would have not noticed it, but when I started the thinning the left (rather flat ground) side, I was suddenly getting scratches high up the blade face and this was the reason.
This is how the knife looked after the thinning (sorry Jon)
And a choil shot - from left to right: Carter KU funayuki (thinned by Greg), Blenheimforge (thinned), Kochi Santoku
And one more - left to right: Carter KU funayuki (thinned by Greg), Yoshikane SKD Hakata, Blenheimforge (thinned)
Performace - part II
Anyhow - after about 1 hour on JNS 300 stone (which did incredible job and basically did not dish at all - I am super impressed - well done Maxim!) I had the knife where I wanted it to be. I have sharpened the blade with Gesshin 2000 and followed up with Gesshin synthetic natural. And wonder happened.
The knife now cuts extremely well - the tip go through onions without any resistance at all. Chopping of vegetables is a joy. Of course - that slight asymmetry in grind largely remained (as it takes place further up the face of the blade) - once the blade behind the edge was thinned running with two fingers from the spine to the edge would let you feel it. I did not find it to be a problem though. On one occasion I noticed a slight steering - when I was slicing halved butter squash.
Making a relative comparison the knife cuts very close to my Carter and does better on hard vegetables then my Yoshikane SKD Hakata.
Since I was impressed on how well the core steel handled very acute angle (after thinning there was very little material left behind the edge) and after I shared that impression with Jon he answered:
A: "Its good to know that the edge preformed well even after thinning, your blade was one of the last blades we heat treated using the "traditional" method- relying on the colour of the steel to gauge the temperatures required for the various stages of heat treat. We have since moved on to using an electronically controlled heat treating furnace- as much for efficiency as anything else (no more waiting until it gets dark before we can heat treat!). ... yes the heat treat was a real nightmare to learn. We've destroyed close to a thousand blades figuring out the right way to do it. I think that we enjoyed a privilege that is not available to most japanese makers- the ability to learn stuff on our own time and to experiment."
I talked to Jon about the grind, it seemed that they aim for rather flat grind where I expressed opinion that certain amount of convexity is needed for optimal performace:
A:" This is very useful stuff for us going forward as we are constantly fine tuning our process especially with regards to grinding the blades. We've recently switched to grinding on a large rotating water stone as opposed to a belt grinder, and this results in an initial concave grind that then has to be flattened. This is in contrast to the grind from the belt sander that produces a flat grind (if done properly) which is then convexed while polishing."
Refinishing
However - there was still work to be done. The thinning left obvious marks on the blade and really called me to give the knife a little more care. My first quick attempt was to polish the blade with small piece of cloth and collected stone dust - that did decrease the contrast of the scratches, but did not give the finish I wanted. I will give the knife a more thorough finish at later stage (just ordering some fine grit sandpaper at the moment). I will add photos once that happens.
Summary
Even though not everything was perfect, I really like the knife and I enjoyed the process of it being made - in particular the exchange I had with Jon. I am glad I could support young, motivated group of people who were joy to work with and listened when I had a question or a comment (and Jon knows that I had plenty of both).
I would like to stress - even though guys from Blenheimforge are no 17th generation bladesmiths just yet - they are doing the effort of improving and learning new skills (their first powerhammer was just delivered), and they are very open to suggestions, questions and advice. That together with their energy and persistence really puts them on the right track to become master bladesmiths one day.
Already today Jon and his friends and Blenheimforge make knives that (in my case with a little effort on my side) perform really well, have their own unique character and are definitely worth a try.
Thanks to Jon for following up on all my questions and putting up with my 'advices' - both of which were plentiful :wink:
Matus
****
Looks good on magnetic holder (here before thinning)