Understanding Distal Taper

Kitchen Knife Forums

Help Support Kitchen Knife Forums:

This site may earn a commission from merchant affiliate links, including eBay, Amazon, and others.
Yes, but my grinds are not the same like Herder, trying to minimize contact area of the food with more convex / concave grinds to the edge, to make sturdy blades combined with ease of cutting.

The only full flat part of the grind should be the edge its self under 0,1mm in height ;)

Regards

Uwe
 
From what I can see through a Google translate, they don't appear to give any information on it other than 'it takes skill to make'.
I wonder if it's their version of a rounded choil?
 
Yea, I was about to write that all they say in translation is:

"This shape gives high stability, but at the same time allows a very thin and finely ground edge."

which didn't make much sense to me. That is, rounding the spine doesn't make that any more true than it already was.
 
I wonder if it's their version of a rounded choil?

nope, it is way below a rounded spine, this is made to minimize friction while cutting food ;)

Less contact area, less sticking or adhesion....

Regards

Uwe
 
  • Like
Reactions: ian
On something the size of a steak knife? That seems strange to me.
csm_02_01_013_5f5ef78612.jpg
 
Yea, I was about to write that all they say in translation is:

"This shape gives high stability, but at the same time allows a very thin and finely ground edge."

which didn't make much sense to me. That is, rounding the spine doesn't make that any more true than it already was.

@suntravel does "stabilität" mean "stiffness" in this context?
 
@suntravel does "stabilität" mean "stiffness" in this context?

not realy, it means to have a easy cutting blade with some reseveve for abuse....

On something the size of a steak knife? That seems strange to me.

They are also making larger blades ;)

Ever used an Herder 1922, K-Chef, or K5 ? Could be a fine expirence if you get a good one, not all from Herder have the old soul since there master grinder passed away....

Regards

Uwe
 
Last edited:
I have actually ground a knife like this at the tip, Kono Ginsan MM w/ a robust spine and a very thin TBE edge grind...so in order to "thin" the knife, removing the "path of most resistance" leads to shaving the corner off the spine like that diagram.

Experimentally, it worked, and was a lot less work (removed alot less metal) than if you "thinned" the knife flat on the bevel. Since the grind on that knife was so thin TBE already, flat-bevel thinning wasn't ideal. Its not clear if this is just a "life-hack" shortcut apllicable to tip area mods or if it makes sense elsewhere...My Q was an honest attempt to get more feedback.

So appreciate the contributions.
 
Last edited:
@Luftmensch it seems like what you're suggesting is simply to introduce a compound grind wherein the two hira are not necessarily parallel, and their inclusive angle varies from heel to tip?

That is correct!

Again; I am not suggesting there is any benefit from the design! Only that it is possible to have a distal taper with a constant primary bevel...
 
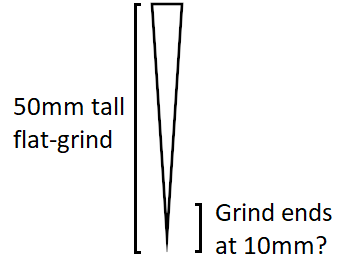
Presenting the 'constant primary bevel, distal tapered' grind...

I will walk through it as seen by CAD. Note that this is completely at odds with how this blade geometry might actually be manufactured. Lets create the knife based on a chef knife/gyuto profile. The spline below represents the cutting edge:


00_edge-profile.png


Chose a primary bevel profile you would like to sweep across the cutting edge. In the previous example it was a simple triangle. The following image shows the primary bevel profile in green and the cutting edge profile in red (before we sweep the volume):


02_primary-bevel-path.png


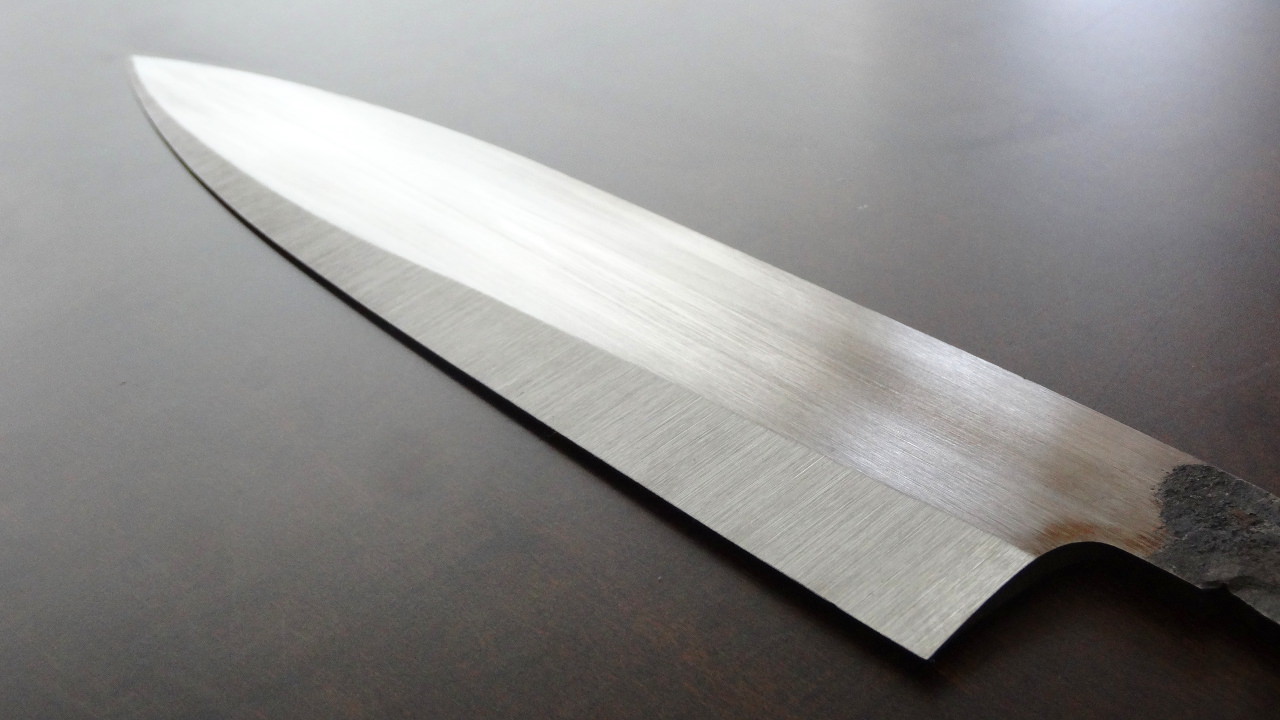
After sweeping the primary bevel profile down the cutting edge we end up with the following volume:

03_primary-bevel-sweep.png


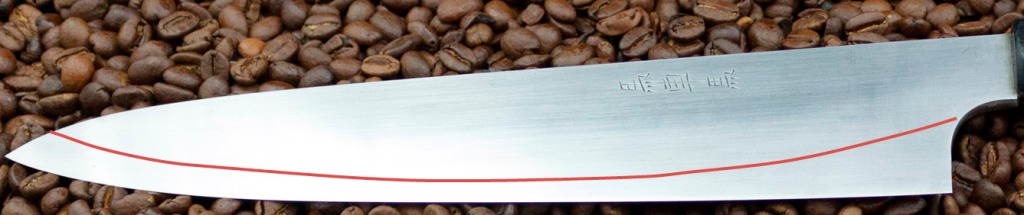
We can fill in the rest of the body as we see fit. This decision can include distal taper considerations. At the maximum height of the blade we draw what we want this silhouette to look like (shown in red):

05_body-loft-profile.png


Back to boat building... :rolleyes:... to render a volume from the distal taper profile (red, above) to the rectangular but curved primary bevel surface, we loft from one to the other creating:

06_body-loft.png


... at this point it is a weird 'blank' with a constant swept bevel and a nice distal taper. After profiling the spine:

07_isometric.png


Which isn't too bad looking! The following schematic is what the blade looks like from the right side (top left), the bottom (bottom left) and the front (top right):


schematic.png


To get a better sense of what is going on I have coloured the spine green, the primary bevel red and the face/hira blue. From the front:


front_coloured.png


and from the bottom:


bottom_coloured.png


Finally, just for fun, with tang:


isometric_tang.png
 
Last edited:
Very cool stuff! Thanks for taking the time to do this.
The bevel is quite low, is it possible to raise the shinogi and apply the same concept?
Also there is something showing up that I mentioned earlier to you specifically. If I understand it correctly, the heel of your knife has the following cross-section and so there would be no shinogi there.
front_coloured-png.63328

Does this mean that the grind ends at the 10mm tall mark, even though the sides are flat all the way up to the spine?
vVRuXdA.png
 
If I understand it correctly, the heel of your knife has the following cross-section, and so there would be no shinogi there.

Presumably that’s an accident of the particular choices made in the construction. It just so happens that the way the width of the spine was chosen, and the way the primary bevel was drawn, the grind looks like it might be flat near the heel. (However, the color picture isn’t a cross section near the heel, it’s a view of the knife looking at it from in front of the tip, so I find it a bit hard to tell.)

If the spine is chosen to be sufficiently thin near the heel, though, you’ll get a defined shinogi below it. That is, you need to choose the width of the spine at the heel to be less than what you’d get from a flat grind with the chosen primary bevel. Since you can specify the spinal width and the geometry of the primary bevel completely independently, and the rest of the grind just interpolates between these, you can do this.

@Luftmensch, how about a passaround of a 3d printed version? :) I’m curious to test how it feels on the stones.

It’d be interesting to me to understand how you’d grind something like this. For instance, is there some particular way to do the interpolation between spine and bevel (what @Luftmensch is calling the lofting) that would lend itself to a straightforward grinding approach? Obviously, I have no idea what I’m talking about when it comes to grinding, though. Much respect to those of you that do.
 
Last edited:
Oh so the cross-section at the heel looks something like this? (ignoring the colours and internal lines)
e8EFFKk.png

Oh man, that would be really uncomfortable.
 
Oh so the cross-section at the heel looks something like this? (ignoring the colours and internal lines)
e8EFFKk.png

Oh man, that would be really uncomfortable.
No, the heel cross section is the blue area above. Green is the spine - it just looks funny from this perspective due to foreshortening and the spine's curve.
 
No, that’s something else. Take your knife, paint the spine green, paint the knife red below the shinogi, and paint it blue above the shinogi. Then hold it in front of your face like you’re going to stab yourself. That’s the color picture.

Edit: +1 to Nikabrik
 
Presumably that’s an accident of the particular choices made in the construction. It just so happens that the way the width of the spine was chosen, and the way the primary bevel was drawn, the grind looks like it might be flat near the heel. (However, the color picture isn’t a cross section near the heel, it’s a view of the knife looking at it from in front of the tip, so I find it a bit hard to tell.)

If the spine is chosen to be sufficiently thin near the heel, though, you’ll get a defined shinogi below it. That is, you need to choose the width of the spine at the heel to be less than what you’d get from a flat grind with the chosen primary bevel. Since you can specify the spinal width and the geometry of the primary bevel completely independently, and the rest of the grind just interpolates between these, you can do this.
I agree, it works in theory and in practice, depending on all the widths and angles. The as you can imagine, the shinogi can easily get washed out if you're after both a thick spine and a thin grind at the heel.

It’d be interesting to me to understand how you’d grind something like this. For instance, is there some particular way to do the interpolation between spine and bevel (what @Luftmensch is calling the lofting) that would lend itself to a straightforward grinding approach? Obviously, I have no idea what I’m talking about when it comes to grinding, though. Much respect to those of you that do.
Yeah it can be a struggle sometimes, trying to balance everything we've mentioned so far. Having a defined line along a shallow angle where two faces meet is easier on paper than at the grinder.
Take a look at one I made here that shows a bit of taper on the 5th picture. It was a real pain in the ass to make that shinogi look good. I'm definitely lowering my shinogi/increasing my bevel angle next time.
 
Last edited:
I believe it. Those pics are killer. I love the simpler aesthetics of some of the ones you’ve been putting up for sale here recently, eg the two stainless ones. I like how they look more than the honyakis, even, although maybe this is just indicating my preference in handles.
 
Cheers! Those two have a different grind, the type where the shinogi drops towards the tip. I'll always prefer the performance of this over a wide bevel (more taper and less stickage) but I can't keep the shinogi defined with the knife looking like that, it just looks stupid! I had a really difficult time trying to convince people in an old thread that it's only an illusion - the angle of this bevel doesn't get thicker towards the tip. The angle could actually be getting thinner and it would still look like this, should the spine taper off into nothing. There's no way to tell from a picture alone.
Rather than repeating everything in this thread, it's easier just to hide everything by smoothing over the shinogi with a curve (which can further increase performance) and the knife ends up looking like the two you mentioned above.
JPGQnsL.jpg

"...In the picture below the red line indicates where approximately the main convexity curve is. The blade does not have a shinogi line, but if it were to have one, this would about be where it is."
katocurve.jpg
 
Last edited:

Very cool stuff! Thanks for taking the time to do this.

Thank you kindly! Happy to participate in an exchange of ideas!

The bevel is quite low, is it possible to raise the shinogi and apply the same concept?

Absolutely... so long as the geometry is valid, CAD software will render it!

Also there is something showing up that I mentioned earlier to you specifically. If I understand it correctly, the heel of your knife has the following cross-section and so there would be no shinogi there.

No. @ian and @Nikabrik beat me to it... I think they helped you visualise it?

Presumably that’s an accident of the particular choices made in the construction. It just so happens that the way the width of the spine was chosen, and the way the primary bevel was drawn, the grind looks like it might be flat near the heel. (However, the color picture isn’t a cross section near the heel, it’s a view of the knife looking at it from in front of the tip, so I find it a bit hard to tell.)

Exactly... I wanted the knife to look plausible.

I chose some arbitrary numbers to render the knife (for what it is worth it is a 240mm length :p). By chance... or more likely because the dimensions I chose had nice numbers, yes, the heel is practically a wedge. To be precise (or at least to 32bits!) there is an angle change of 0.07 degrees. Lets just say this can be swept up as rounding error: I chose numbers that made the bevel profile and heel profile similar triangles inadvertently. But this is not a requirement - just a coincidence.

Since you can specify the spinal width and the geometry of the primary bevel completely independently, and the rest of the grind just interpolates between these, you can do this.

Thats right! If you conceptually separate the primary bevel from the 'body', you can make independent design decisions... in theory. To be fair... also in practice. However, the cost of doing it 'in practice' would be high. It would either violate large scale economics (e.g. punching out mono-steel blanks and grinding them) or be too complex to pull off (well) for craftsmen.

@Luftmensch, how about a passaround of a 3d printed version? :) I’m curious to test how it feels on the stones.

Dont be giving me dangerous ideas :confused:

It’d be interesting to me to understand how you’d grind something like this. For instance, is there some particular way to do the interpolation between spine and bevel (what @Luftmensch is calling the lofting) that would lend itself to a straightforward grinding approach? Obviously, I have no idea what I’m talking about when it comes to grinding, though. Much respect to those of you that do.

Now you have me wondering if additive manufacturing/laser sintering (see also) can produce hard enough metal structures for knifes! :D

CNC milling could certainly cut a complex shape from stock material... Maybe you could do it on an unhardened billet and then get some talented folk like @Kippington to heat treat it?


Then hold it in front of your face like you’re going to stab yourself. That’s the color picture.

The tip straight into the eyeball!
 
Or consider casting it? Using something like C95500 nickel aluminium bronze, which is according to an article I read able to approach steel in qualities and can be heat-treated! Not able to verify myself since I have a lack of knowledge of metallugy

upload_2019-10-25_13-58-46.png

upload_2019-10-25_13-59-13.png

upload_2019-10-25_13-59-43.png
 
I would think that if you freehand ground it, you would approach it one of two ways:

1) grind in a full length upper bevel that matches the heel, with no taper. Then set you taper right at the spine, before blending down.

2) do distal taper first, then grind down to a varying temporary edge thickness that gives you the right geometry (thicker at the tip).

In theory, it's essentially the same as a full flat grind from a tapered spine. In practice, I'm sure it would be a pain.
 
My previous example was a bit subtle. Lets go 'caricature mode' so the geometry is easier to see. Lets say the spine is very much thicker than the bevel, then we have:


thick_heel.png


As a schematic; view from the back (top left), the right side (top centre), the front (top right) and the bottom (bottom centre):


thick_heel_schematic.png


And colour. Again the spine is green, the primary bevel is red and the body/face/hira is blue. View from the back:

thick_heel_back.png


View from the front:

thick_heel_front.png


and bottom:

thick_heel_bottom.png


** Caveat for the super eagle eyed: I forgot to match one dimension on the tip so there is a very slight change in bevel thickness near the end. I only noticed once I started colouring the images... and eh... laziness...
 
Last edited:
Or consider casting it?

Possibly? Getting high qualities dies would be required to do thin sections. The very, very edge might be tricky!


I would think that if you freehand ground it, you would approach it one of two ways:

1) grind in a full length upper bevel that matches the heel, with no taper. Then set you taper right at the spine, before blending down.

2) do distal taper first, then grind down to a varying temporary edge thickness that gives you the right geometry (thicker at the tip).

In theory, it's essentially the same as a full flat grind from a tapered spine.

Could do? I guess it depends what access to tools a blacksmith would have. You could do it in a machine shop with mills etc...

In practice, I'm sure it would be a pain.

Ha! Amen! There would have to be a compelling reason to bother!
 
Oh it’s okay. Should’ve tried the standard instead of workhorse back in the day.

I've only used one of each, but in my experience, the workhorse definitely had more taper. It was quite beautiful. The standard was much closer to takayuki ginsan.
 
One more in 'plain silly mode'. Lets say the primary bevel is relatively fat and the distal taper is reversed (thin at the handle, thick at the tip):


thin_heel.png


As a schematic; view from the back (top left), the right side (top centre), the front (top right) and the bottom (bottom centre):


thin_heel_schematic.png


And colour. Again the spine is green, the primary bevel is red and the body/face/hira is blue. View from the back:

thin_heel_back.png


View from the front:

thin_heel_front.png


and bottom:

thin_heel_bottom.png
 
I've only used one of each, but in my experience, the workhorse definitely had more taper. It was quite beautiful. The standard was much closer to takayuki ginsan.
I solved the problem by commissioning a custom maker to copy Kato standard profile but with added height and length, and distal taper. :cool:
 
Back
Top