WIP - Bread knife

Kitchen Knife Forums

Help Support Kitchen Knife Forums:

This site may earn a commission from merchant affiliate links, including eBay, Amazon, and others.

jessf

Senior Member
Joined
Jan 10, 2016
Messages
869
Reaction score
6
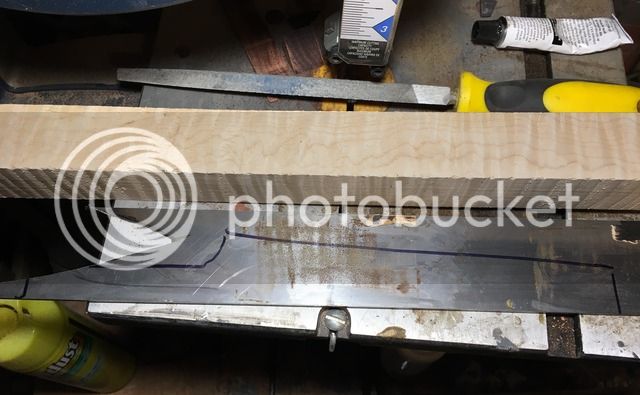
Ive got it in my head that a bread knife is the next project. I have some 1095 left so i want to see if my ideas work. I'll share a concept sketch first.


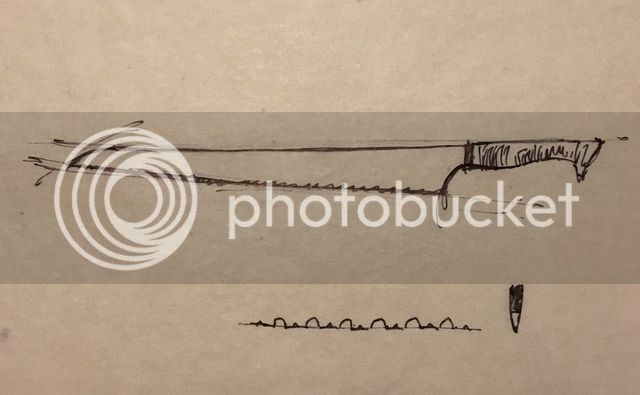
Ill need to forge out the length and cross section then file in the teeth before heat treat. I picked up a 38x38x600 piece of curly maple that I'll stain/dye. I also have the last piece of mokume left over from the Not a Gyuto project. The larger piece went to the paring knife.

 
Neither have I. I'll be interested to see how he handles the heat treat on such a narrow piece.
 
This is going to be cool :) I am toying with the idea ti make a bread knife since quite a while, but the concept is still only brewing in my head. I am very curious how you will proceed here. Good luck!
 
You are definitely the most versatile and ambtious amateur ive come across. Good luck and keep us posted!
 
First things first. I meed to fix this platton. If it's intentional in the design or just a pourly located weld the platton doesn't touch the backside of the belt. There's about a 3mm gap.


I would have preferred metric but we do what we can. Im going to secure a 6mm piece of D2 to the face of the existing platton.


I can now aply tension as needed.
 
Looks good. I suppose the D2 is hardened.

How easy it is to swap belts? That is one of the things that I really dislike on my 1x30" toy grinder.
 
The d2 isnt hardened but i can do so. To replace a belt you push the small rubber wheel towards the large drive wheel and compress a spring in doing so. The smaller wheel is then held in place by a catch so you can swap out the belts. It's a pretty cool little gizmo.
 
If you harden the D2 it will last much longer. But his little grinder surely looks really cool. I am looking forward to hear your feedback once you get some work done with it.
 
A nights work. I started with 203mm the stretched it out anotther 30mm. My goal is 254mm or 10" when complete. I will do more tomorrow.

 
Why don't people use planishing hammers to forge. Small fast impact force and very cheap to purchase.
 
but the concept is still only brewing in my head. I am very curious how you will proceed here. Good luck!
 
Your goal length sounds good. I have the MAC (26cm) and it feels just right length-wise. Definitely not too long.
 
Looks cool... the serrations are designed such that you just sharpen the whole knife edge like a non-serrated knife?
 
That's the idea yeah. Essentially im making a long blade and filing in teeth that will be easy to maintain over the course of it's life. The teeth will be perpendicular to the edge. The slight curve to the blade will ensure that the edges of several teeth are always ripping and slicing into the bread. Im kind of treating it like a bread saw. That's the idea at least.
 
My process for most knives has been to do a rough sketch, not to scale, then scan it into autocad where i can scale it up and produce a template. I stretched the length of the blade to within 6mm of the desired 254mm before roughing out the profile. With things trimmed up i can work to even out the distal taper, grow another 6mm, then retrace with my template and trim it up again. It's of course a better use of material to just start with less and cut off less. That's a goal I'm working towards but with the tools and forge i have now, less heating the better.

 
Finished for today. Fitted the mokume. Will begin grinding bevels tomorrow.


Looks good so far Jessf. I am really curios how the grinding (and later sharpening will go). This project of yours is a great inspiration :)
 
What a difference havingtje right tools makes. grinding bevels took a fraction of the time on this grinder attachment than compared to the belt sander.


Handle is roughed out.


I used CA to glue up the bolster and it held through all the heat of sanding while leaving no glue line and curing in a minute. Much better than epoxy.


Heat treat complete. No warping on this thin 10" blade. Very pleased.


Have to get a loaf of crusty bread and give it a go. Looks great!
 
Fantastic! On top of looking great you seem to take less time to finish a knife than I need to finish an article about making a knife :)

I have a few questions though:
- did you sharpen in some way the scallops after HT? If yes - how?
- what did you use to dye the handle - it looks really nice
- how does it cut?

Again - great job om this one :thumbsup:
 
i filled in the scallops pre heat treat then cleaned them up with a diamond bit in the dremel post heat treat. The handle colour comes from using dark stain which i applied with vacuum pressure. It allows the wood to absorb as much stain as it can. Buffed it out with danish oil and steel wool for the finish.

I cut a bagle in half with relative ease. One thing i noticed is the teeth did not clog with crumbs like the other bread knives I've used and there were no crumbs on the cutting board either. I need to try some crusty bread to see how it cuts.
 
Back
Top