
You are using an out of date browser. It may not display this or other websites correctly.
You should upgrade or use an alternative browser.
You should upgrade or use an alternative browser.
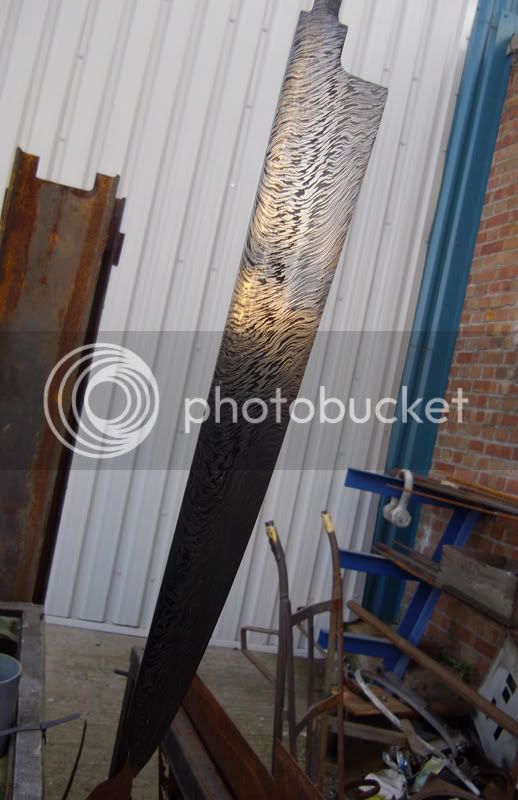
Just out of the etch.
- Thread starter WillC
- Start date


Help Support Kitchen Knife Forums:
This site may earn a commission from merchant affiliate
links, including eBay, Amazon, and others.
Is this a personal knife or will it be available for sale?
WillC
Senior Member
- Joined
- Jul 9, 2011
- Messages
- 2,142
- Reaction score
- 5
I'm not entirely sure Dave as its not finished. But having re-read the rules. I really don't want to tread on toes so please press the button. I did mean to get some shots of the pattern developing, but it's all a bit hot and fast and forgot:O So i'll post something more suitable next time.
Well, it's a very cool-looking piece, regardless.")
I agree, that's some very nice looking damascus.
WillC
Senior Member
- Joined
- Jul 9, 2011
- Messages
- 2,142
- Reaction score
- 5
Thanks Guys, I would say i'm just starting out in pattern welding really, the W's pattern is a good one to learn and a good key to a few others and a good place to start experimenting with your own variations. I have found a good bit of information on how to make a basic W's pattern and once you get your head round it it sort of clicks. I make my mosaic patterns by over compressing the pattern in the end of the bar then stacking high and flipping it over forging it out with the pattern now ontop of the billet. This means there is little waste unlike cutting the billet to expose the pattern. It does mean you have to put up with a good bit of distortion in the pattern, I like a bit of accident so am happy with that. And you have to get the initial layer count and compression right for the size of final billet you will draw the material to.
Completely confused? I've done some sketches.

The initial layer count determines the boldness of the W's. 30 layers makes the W's quite small, as low as 7 makes them really bold. For my billet I did 11 I think.
Having forge welded the first stack most carefully, it is rotated 90 degrees, so the layers are vertical.
You then forge the vertical layers down flat and draw out the billet into a bar.
Pushing vertical layers on end makes the middles bow out as shown, this is the start of the pattern.
Cut the bar to 4 and restack and reweld. This step is done a total of 3 times, This is the part where you are compressing the pattern and this amount of compression will depend on how much you need to forge out the final billet.
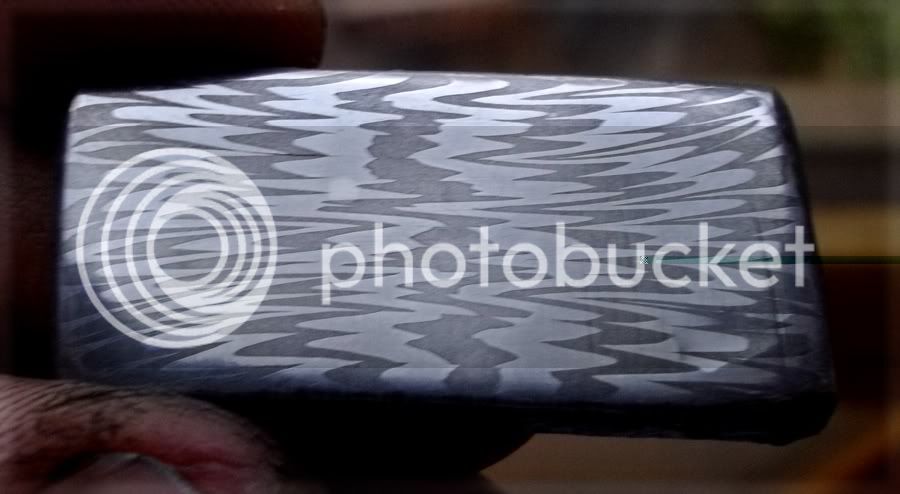
Here is the pattern in th eend of the bar of a w's billet after one stack of 4.
With each stack this compresses the pattern further in the end of the bar.
Final stage
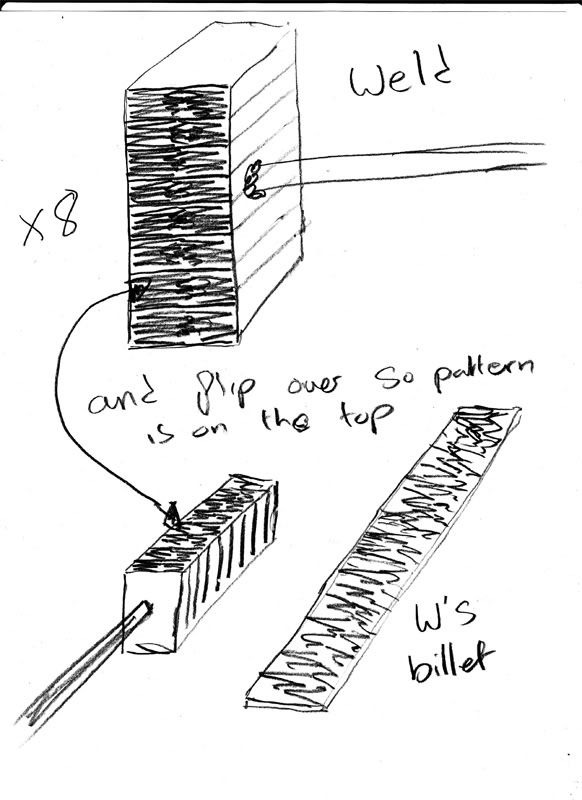
The final stage is to do one final high stack. For thicker knives this may be a stack of 6, in my case I went to 8 as I want to forge the billet out quite thin without washing the pattern out. Weld it together taking great care at this stage that it is completely welded on all sides.
I normally stop and grind the billet smooth after this to check for flaws.
Lastly is important and easy to get the billet the wrong way around. Turn the billet so the W's in the ends of the bars are upright, a quick etch can confirm. Weld the bar the hold the billet now on the end so you can draw the billet out with the pattern on top.
Thats about it really. This is the best I have got the pattern for a long thin billet for thin knives. But I am fine with a bit of accident and distortion. I prefer the challenges of compressing/decompressing a pattern to cutting into a billet to expose the pattern, I don't think I could suffer the waste of that.
Hope it makes sense.
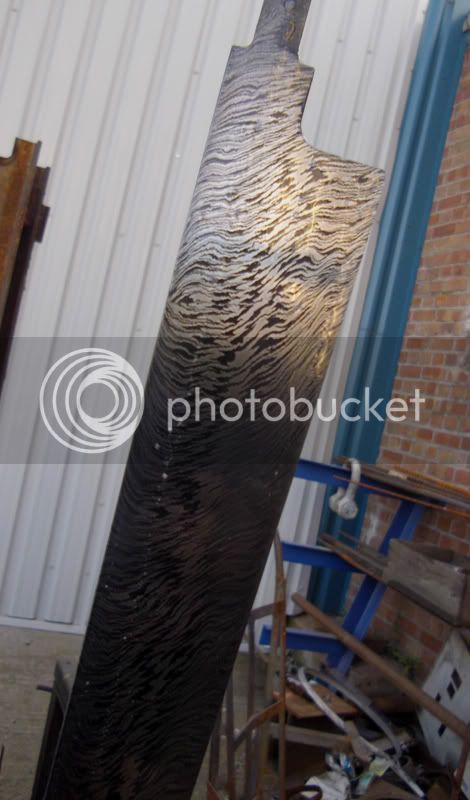
Here is the blade after a polish
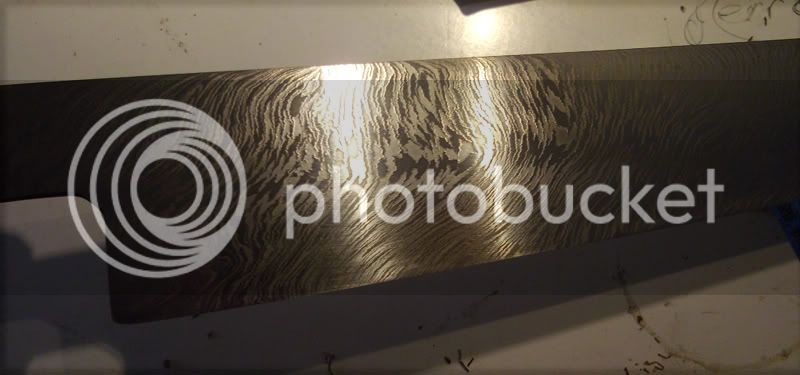

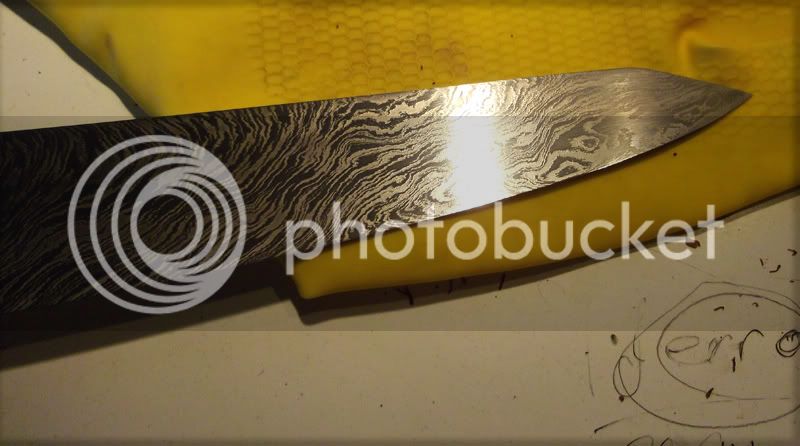
You can see at the end where the blade has been forged much thinner the pattern just starts to wash out and you loose the W's, it turns into a more random effect. If I had the compression wrong it would all look like that. More commonly I have over compressed billets and with many layers in the start billet. But i'm happy making controlled mistakes and sometimes you get a nice surprise.
Completely confused? I've done some sketches.
The initial layer count determines the boldness of the W's. 30 layers makes the W's quite small, as low as 7 makes them really bold. For my billet I did 11 I think.
Having forge welded the first stack most carefully, it is rotated 90 degrees, so the layers are vertical.
You then forge the vertical layers down flat and draw out the billet into a bar.
Pushing vertical layers on end makes the middles bow out as shown, this is the start of the pattern.
Cut the bar to 4 and restack and reweld. This step is done a total of 3 times, This is the part where you are compressing the pattern and this amount of compression will depend on how much you need to forge out the final billet.
Here is the pattern in th eend of the bar of a w's billet after one stack of 4.
With each stack this compresses the pattern further in the end of the bar.
Final stage
The final stage is to do one final high stack. For thicker knives this may be a stack of 6, in my case I went to 8 as I want to forge the billet out quite thin without washing the pattern out. Weld it together taking great care at this stage that it is completely welded on all sides.
I normally stop and grind the billet smooth after this to check for flaws.
Lastly is important and easy to get the billet the wrong way around. Turn the billet so the W's in the ends of the bars are upright, a quick etch can confirm. Weld the bar the hold the billet now on the end so you can draw the billet out with the pattern on top.
Thats about it really. This is the best I have got the pattern for a long thin billet for thin knives. But I am fine with a bit of accident and distortion. I prefer the challenges of compressing/decompressing a pattern to cutting into a billet to expose the pattern, I don't think I could suffer the waste of that.
Hope it makes sense.
Here is the blade after a polish
You can see at the end where the blade has been forged much thinner the pattern just starts to wash out and you loose the W's, it turns into a more random effect. If I had the compression wrong it would all look like that. More commonly I have over compressed billets and with many layers in the start billet. But i'm happy making controlled mistakes and sometimes you get a nice surprise.
Nice posts - thanks Will! :thumbsup:
The hekler
Senior Member
- Joined
- Sep 12, 2011
- Messages
- 463
- Reaction score
- 0
Very nice, I actually like the more loose pattern towards the tip, less eye catching but very organic looking and still a great looking piece of damascus.
JohnnyChance
Founding Member
- Joined
- Feb 28, 2011
- Messages
- 3,456
- Reaction score
- 29
Great pattern. I like how it changes near the tip as well. Thanks for the diagrams/explanations.
Twistington
Senior Member
- Joined
- Jul 2, 2011
- Messages
- 506
- Reaction score
- 0
It kinda looks like a tiger and a zebra at the same time... i like it! Nice of you to post a how-to.
stevenStefano
Senior Member
I agree with everyone else that the way the pattern changes actually looks really cool
Eamon Burke
Senior Member
- Joined
- Mar 5, 2011
- Messages
- 4,931
- Reaction score
- 13
This is really cool!
- Joined
- Feb 28, 2011
- Messages
- 3,580
- Reaction score
- 25
Thanks. Those sketches are amazing. Simple and very informative.
k.
k.
PierreRodrigue
Senior Member
- Joined
- Mar 1, 2011
- Messages
- 1,974
- Reaction score
- 1
Very nicely done! Looks great!
HHH Knives
Senior Member
Thats some sweet damascus right there! Great explanation of the pattern development as well.
Mike Davis
Senior Member
- Joined
- May 2, 2011
- Messages
- 1,921
- Reaction score
- 0
I will have to agree with everyone! That is some stunning damascus! Great explanation also, i am stocking up information for when i really start the damascus making and i appreciate the information!
WillC
Senior Member
- Joined
- Jul 9, 2011
- Messages
- 2,142
- Reaction score
- 5
No worries Mike, there are a few other tutorials of this pattern if you google "feathered W's". Same pattern except I haven't split the billet to make the feather pattern. Well worth checking out some of Mick Maxen's stuff as well on british blades. I've got several ones of his book marked. I'm sure he posts on Don Fogg's forum too though.