
You are using an out of date browser. It may not display this or other websites correctly.
You should upgrade or use an alternative browser.
You should upgrade or use an alternative browser.
Matus Knives - finished projects
- Thread starter Matus
- Start date


Help Support Kitchen Knife Forums:
This site may earn a commission from merchant affiliate
links, including eBay, Amazon, and others.
wow look so good!!!
thank you so much for sharing this information
:wink::wink::wink:
Thank you
")
I have been slow on updating this thread and my blog in a while, but I am working on several projects that should get finished within a few weeks and I HOPE to finally get that 2x72" which is long overdue. I did finish one smaller project recently that I will put here in the next few days.
BloodrootVW
Well-Known Member
- Joined
- Oct 20, 2014
- Messages
- 61
- Reaction score
- 0
Very nice work, Matus!
I have finished a few more projects recently and I am finally getting around to write the blog posts.
First a project that was finished a while ago - Project #8 - just a simple WA handle from black locust and purple heart for a 240 Kurouchi blue #2 Tanaka gyuto. You can read more about it here.
A few photos of the finished handle:

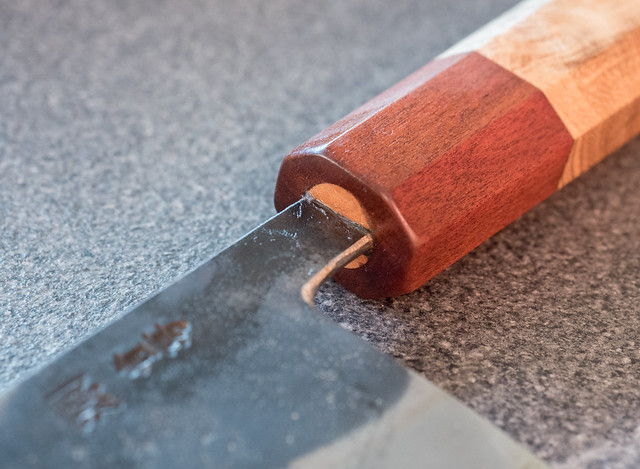
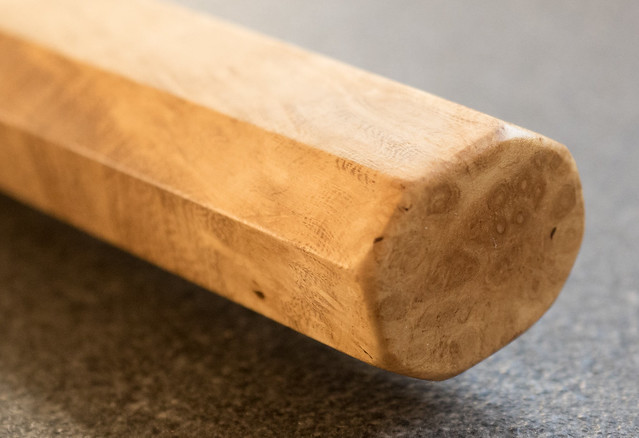

First a project that was finished a while ago - Project #8 - just a simple WA handle from black locust and purple heart for a 240 Kurouchi blue #2 Tanaka gyuto. You can read more about it here.
A few photos of the finished handle:


Nice western there Matus!
Didn't expect Matus to be the first to post DICK pics.
You know Jess, sometimes I am such a ...
- Joined
- May 1, 2012
- Messages
- 4,101
- Reaction score
- 10,683
:lmao:Didn't expect Matus to be the first to post DICK pics.
valgard
Stones Addict (terminal case)
love the western on the bread knife
merlijny2k
Senior Member
- Joined
- Mar 3, 2016
- Messages
- 590
- Reaction score
- 43
Wow I wasm't following this part of the forum but was clearly missing out!! Great stuff Matus. For what it's worth I agree with jessf about the wood expansion. Perhaps best to keep wood in an application like this varnished or otherwise prevented from soaking up water. Expansion of the stone would cause compressive stress which isnt damaging. Wood expands and you get tension in the stone.
merlijny2k
Senior Member
- Joined
- Mar 3, 2016
- Messages
- 590
- Reaction score
- 43
Love how tight you make those brass plates fit the handle. And scratches really are the bane of our existance are they. I just realized watching your work that those Japanese style handles are free of my other bane: metal dust getting into the handle wood. I rehandle mostly three rivited scales and sanding down the rivets and getting the wood flush with the tang always end with some metal dust in my wood that is really hard (impossible) to get rid of. Have you had that problem too making the metal-fronted handles?
I indeed experienced the same problem as you describe - in particular as one goes to finer sanding paper. Somewhere past #600 I started to get brass dust embedded in the ironwood and I was not able to remove it. With a metal bolster one could try to sand only in one direction and clean (or change) the sanding paper regularly, but with brass pins there is little one can do. Maybe it can be removed during buffing, but I am really not sure. I guess we need to ask the more experienced makers around here.
jessf
Senior Member
- Joined
- Jan 10, 2016
- Messages
- 869
- Reaction score
- 6
Steel wool should clear the grain but you need to be carefull not to wash out the wood around the metal pin or you get a noticable lump where the pin is. I can feel this on my Neeman and it's obvious they hand sanded without blocks.
You are absolutely correct Jess.
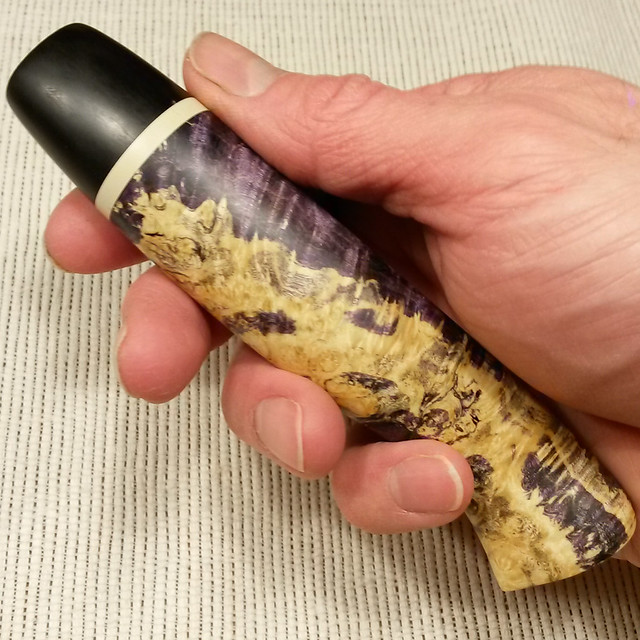
And now for something completely different This is officially my first full custom project. I started working on it back in March. As usually it took me longer than expected - even without any major setbacks or misshaps. There was a lot that was new to me - blade shape, design, material, handle design, etching, etc.
The blade is from Swedish Damasteel, the handle from stabilised & dyed ulm burl and stabilised white ebony. Spacer is white G10.
I am very grateful for being given all the time I needed to finish. I tried to do my best to communicate in detail what is going on and what is to be done next. I have enjoyed the design process - from the blade to the handle materials. I found the communication not only enjoyable, but also vital to the whole project.
It goes without saying that the result is not 'perfect' and I will definitely be making adjustments to my process in the future - but I think that the knife turned out nicely and the positive feedback from the customer is what counts
Of course all the details can be found on my BLOG.
Here a few photos of the finished knife:


This is officially my first full custom project. I started working on it back in March. As usually it took me longer than expected - even without any major setbacks or misshaps. There was a lot that was new to me - blade shape, design, material, handle design, etching, etc. The blade is from Swedish Damasteel, the handle from stabilised & dyed ulm burl and stabilised white ebony. Spacer is white G10.
I am very grateful for being given all the time I needed to finish. I tried to do my best to communicate in detail what is going on and what is to be done next. I have enjoyed the design process - from the blade to the handle materials. I found the communication not only enjoyable, but also vital to the whole project.
It goes without saying that the result is not 'perfect' and I will definitely be making adjustments to my process in the future - but I think that the knife turned out nicely and the positive feedback from the customer is what counts
Of course all the details can be found on my BLOG.
Here a few photos of the finished knife:
This is beutiful, Matus
Mute-on
Senior Member
Whoa!!!
That's spectacular.
J
That's spectacular.
J
valgard
Stones Addict (terminal case)
The customers are very VERY happy with the result Matus. You may say it's not perfect but it's all we envisioned and you saw my wife's reaction... it's been caught in camera, nuf said. You beat me to publishing it :O, I've been really tired and thrown off by jet-lag so I still haven't taken decent pictures. Communication with you was amazing, fast, detailed and very interesting (you even took the time to read my lengthy emails lol).
Thank you valgard, the pleasure was all mine
Thank you guys
Thank you guys
merlijny2k
Senior Member
- Joined
- Mar 3, 2016
- Messages
- 590
- Reaction score
- 43
Man that damscus etching is top notch. Makes you wanna reduce the contrast setting on your monitor. You could make a zebra jealous with that blade. Like your makers mark too.
This was the only time so far I have etched damascus blade - I etched in 37% HCl, room temperature, 5 minutes. I did not do any further sanding after the etch - that would have brought the contrast down a bit. I somehow did not realise that I could have (after HT but before the grind was finished) played around and tested. I was also trying to finish the knife up to certain date (which I did, surprisingly).
valgard
Stones Addict (terminal case)
:O I owe you that meet up.I was also trying to finish the knife up to certain date (which I did, surprisingly).
:O I owe you that meet up.
I will be looking forward to the next chance
qjlforever
Active Member
- Joined
- May 30, 2017
- Messages
- 42
- Reaction score
- 0
great job.make knives more beautiful.
milkbaby
Well-Known Doofus
That came out awesome!!! :doublethumbsup:
The blog post was great too. I really enjoy reading all the details, knowledge is power!
How did you feel about possibly botching up a 90 euro piece of Damasteel?
The blog post was great too. I really enjoy reading all the details, knowledge is power!
How did you feel about possibly botching up a 90 euro piece of Damasteel?
Thanks
Yeah, that 90 piece of steel - that is why I also made a second blade from Niolox - to test how I want to grind it and see whether the profile I have designed together with valgard will sit well in hand.
The Logo was a lot of work for me even though I have payed well for it I suppose it will evolve & change in the future, but I like it and will keep it for a while I guess.
Yeah, that 90 piece of steel - that is why I also made a second blade from Niolox - to test how I want to grind it and see whether the profile I have designed together with valgard will sit well in hand.
The Logo was a lot of work for me even though I have payed well for it
I suppose it will evolve & change in the future, but I like it and will keep it for a while I guess.