Forgecraft Project Knife

Kitchen Knife Forums

Help Support Kitchen Knife Forums:

This site may earn a commission from merchant affiliate links, including eBay, Amazon, and others.

zmaster

Member
Joined
Apr 10, 2018
Messages
23
Reaction score
4
back comparison.jpg


I thought it might be fun to take on one of these Forgecraft refurbishing projects after seeing some amazing ones here. My first goal was to significantly thin the knife. I looked to the Masamoto KS' choil for reference. Since I live in an apartment, I had to do all of my thinning by hand. This took three thinning sessions. At first, I was using the Gesshin 220 pink brick as my main abrasive. However, I made the most progress in my last thinning session with 40/60/80 wet-dry sandpaper with adhesive backing stuck on a slab of marble I usually use for leatherworking.

choil comparison small.png


I took the blade surface up to 1500 grit and polished with green compound on a strop. I realize that there are many scratch marks and other imperfections. But by hour 4, I didn't care too much. Here's a comparison with a Masamoto KS (after thinning session 2 and session 3, respectively; KS on the left and Forgecraft on the right):

compare KS 1.1.JPG

compare KS 2.JPG


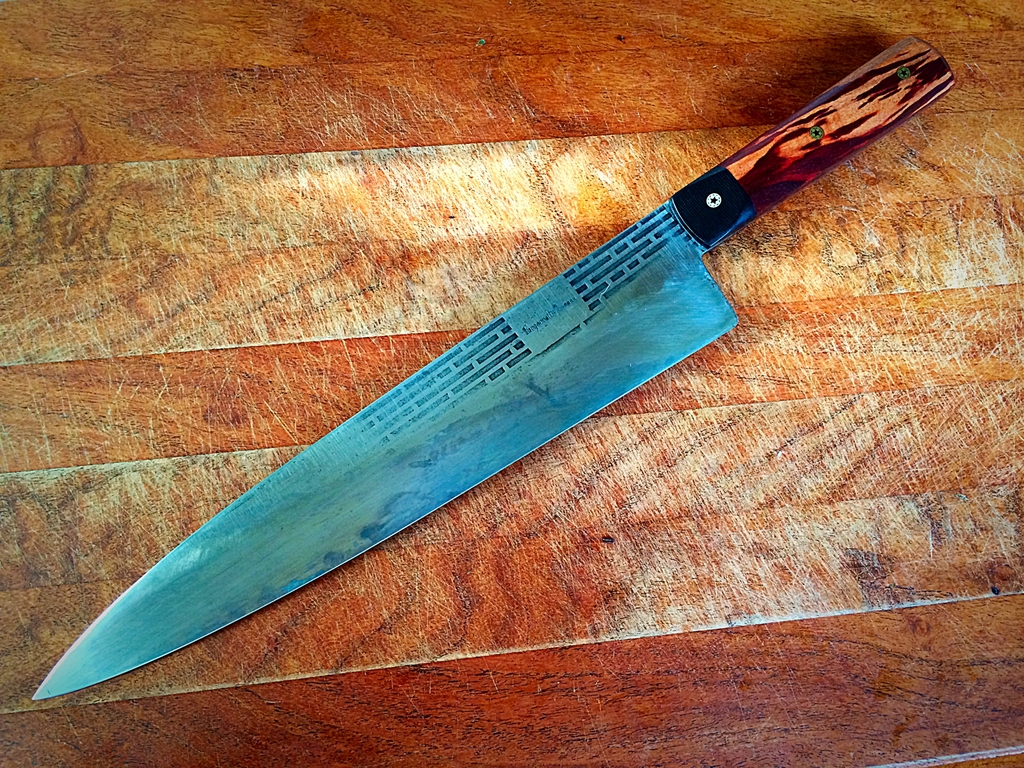
And finally, some progression photos:

logo zoom 0.JPG
logo zoom 1.JPG
logo zoom 3.JPG


This took so many hours, and I am so happy with how it cuts now. I've been thinking of doing a rehandle with a wa handle next. Or perhaps I will make a leather saya for it first.
 
Here are some more pictures of the scratch-filled mediocre finishing + the stamped Forgecraft logo.

_CDC3330.JPG
_CDC3340.JPG
_CDC3345.JPG
 
I think you did a fine job. Must have taken you quiet some time to thin it out by hand this much. Really cool!
 
Ya sandpaper is the way to go for stuff like that. That’s a respectable effort. Hey and if you polish it up you can probably flip it on eBay for atleast $120 if not more.
 
Thanks all!

Given the amount of time I put into this knife, I don't think I will be flipping it. There's more I'd like to do with the handle too.
 
I rehandled a whole bunch of western knives over time but I have always been reluctant to go the Wa conversion route. It seems to me the steel above the heel on most westerns just isn't thick enoug to take away a lot of it without making the knife too flexible. There is a ton of good looking conversions on the site, some by very knowledgeable members, just never could muster the balls for it.
 
Your thinning does look pretty good. How is food release now? Some of my thinning projects ended up with worse than expected food release to the point where I wonder if I make my knives concave while thinning by having my fingers about 1cm above the edge most of the time.
 
Your thinning does look pretty good. How is food release now? Some of my thinning projects ended up with worse than expected food release to the point where I wonder if I make my knives concave while thinning by having my fingers about 1cm above the edge most of the time.

Thanks! Prior to thinning, the Forgecraft was not fun to cut with at all. You can probably tell from the left-most choil photo in my first post. Currently there's definitely some sticking on thinner slices of potatoes, apples, etc. But I wouldn't say it's too bad. I much prefer how it cuts now compared to pre-thinning.

Re: rehandling.
I've been thinking about a wa rehandle mainly because (1) I like the look of a wa handle (2) it seems easier in my mind as I don't have a bunch of tools and it seems like a western rehandle would require some kind of sanding belt. Also having to figure out sourcing and incorporating pins in an elegant way is a little daunting.
You have a good point thought. I'd definitely need to cut away some of the tang to fit it into a wa handle. No solid plans for now.
 
I did my first few rehandles with a file, a saw and some sandpaper :) And those were more difficult than this one because they had bolsters. Wa handle I haven't tried yet (no suitable candidates among my knives).

There are a few angles with the pins. In any case I advise sourcing the pins after removing the handles.

-Usually the original pin holes are rather small
-Pom handled knives typically have additional larger openings in them used in the molding process, forgie probably doesn't I think. These can sometimes be used for larger pins in other than the original places.
-You can check with a file if the tang is hardened. If it is you can't drill the holes out to desired size.
-Doorhandle screws can be shortened and used as an easy to come by and affordable stand in for Corby's. Any hardware store carries them. Used them on almost all my projects. Solid pins is fine too but then you must have a vice or something else to clamp it in during glue up. To this day I don't have a vice.
-It is very important the wood is dry enough. Having it shrink afterwards is not very appealing. Safest bet is to rough cut the scales and then have them lie around in your kitchen for three weeks or so before doing the rehandle

Thanks for your advice! A few questions.
  1. Is the best way to remove the current scales just to grind down the current pin/screws with something like a dremel?
  2. What's the best way to drill holes without a drill press in the new scales for the new pins/doorhandle screws/Corby screws? Could I just use a power drill?
  3. What type of glue or epoxy would be best to go between the wood scales and the tang?
I'm thinking of getting some ironwood scales off eBay and trying a western style rehandle.


A wa conversion seems to difficult because
  1. I don't have a drill press to drill the main hole in the handle.
  2. I would have to cut down the height of the tang (which I guess I could do with a dremel).
  3. And I'm not sure how I would cut the slit into the dowel. (maybe with a hack saw?)
 
1. Yes

2. Yes, if the tang is not hardened. If it is, the easiest way is to adjust pin size to hole size rather than the other way round. If the tang is not hardened you can drill it with an ordinary power drill. Make sure to: 1 set drill to lowest possible speed 2. Add some mineral oil for lubrication !!!. This greatly extends service life of your drilltips. Also limits heat development. 3. If the oil starts smoking your drill is running too hot. The oil acts as a warning sign for overheat. Before I started using lube oil I once permanently ruined four drills on one hole in unhardened but still rather resistant stainless steel. Now I can drill multiple holes without having to sharpen my drill.

3. I am in the Netherlands and you are in the US. I could elaborate on my experiences with different kinds of glue, but probably none of them will be for sale in your area. In the Netherlands everyone uses the local Bison brand glues which are fine but I don't think the company has much of a global reach. Just take the easiest to get brand of clear epoxy and you will probably be fine. Be carefull however to take a slow curing one. Half to three quarters of an hour working time and multiple hours curing time is the way to go. Nowadays the 5 and 10 minute working time and curing in under an hour glues are often the most popular, but things tend to take more time than they should getting the fit right. Being under time stress doesn't help with the end result.

Can't help you with the Wa handle questions. Many here find the blog by member Matus a good place to start learning. He is very meticulous in documenting his work and methods.

http://matuskalisky.blogspot.com/2016/06/project-3-petit-gyuto-kitchen-knife.html?m=1
 
The tang on Forgecrafts is hardened, at least with respect to the top half of the handle, and pin hole. The easiest way to drill holes in forgecrafts is with a carbide bit.
 
1. Yes

2. Yes, if the tang is not hardened. If it is, the easiest way is to adjust pin size to hole size rather than the other way round. If the tang is not hardened you can drill it with an ordinary power drill. Make sure to: 1 set drill to lowest possible speed 2. Add some mineral oil for lubrication !!!. This greatly extends service life of your drilltips. Also limits heat development. 3. If the oil starts smoking your drill is running too hot. The oil acts as a warning sign for overheat. Before I started using lube oil I once permanently ruined four drills on one hole in unhardened but still rather resistant stainless steel. Now I can drill multiple holes without having to sharpen my drill.

3. I am in the Netherlands and you are in the US. I could elaborate on my experiences with different kinds of glue, but probably none of them will be for sale in your area. In the Netherlands everyone uses the local Bison brand glues which are fine but I don't think the company has much of a global reach. Just take the easiest to get brand of clear epoxy and you will probably be fine. Be carefull however to take a slow curing one. Half to three quarters of an hour working time and multiple hours curing time is the way to go. Nowadays the 5 and 10 minute working time and curing in under an hour glues are often the most popular, but things tend to take more time than they should getting the fit right. Being under time stress doesn't help with the end result.

Can't help you with the Wa handle questions. Many here find the blog by member Matus a good place to start learning. He is very meticulous in documenting his work and methods.

http://matuskalisky.blogspot.com/2016/06/project-3-petit-gyuto-kitchen-knife.html?m=1

The tang on Forgecrafts is hardened, at least with respect to the top half of the handle, and pin hole. The easiest way to drill holes in forgecrafts is with a carbide bit.

Awesome, thanks!
 
I decided that if I am going to attempt a handle, I'll be doing a wa handle the sandwich way Carter does it so I won't need a drill press to drill a tang hole for the majority of the handle length.

I will still have to drill through the ferrule with my handheld drill.

I just received a block of ebony for the ferrule and two blocks of ironwood.

This may turn out to be a miserable failure. But for now, I'm just excited about how the wood looks.

_CDC3596.JPG
_CDC3614.JPG
 
Great job on the thinning. Choil shot looks awesome.

I have taken on one of these a couple years ago. Got the knife from fleabay. It was a great learning experience. Thinning these knives is no joke.

A couple comments on my experiences.
The tang is hardened, and the holes are small. It was difficult to get the holes opened to 3/16 for my pins. Get a good drill bit. Drill press helps here.
Since the handle is straight, I did a semi-WA full tang handle with an octagonal contour and a heavily beveled bolster. Just something that I have liked on a few of my knives with short necks.

Food separation on mine is horrible. Anything wide, even yellow squash will suction on with a vengeance. Carrots hold on particularly well for some reason. I thinned the bevels with a Diamond stone, which created very flat sides not helpful for food release. It is the only thing I do not like about the knife. The edge holding is quite well, so I believe the heat treat was done right on this example. I love the profile, and the blade cuts really well now, however the food sticks so bad that is hinders the knife moving through product and gives the impression of wedging that is not there.

YEHFWcx.jpg
 
Back
Top