Octagon wa handles

Kitchen Knife Forums

Help Support Kitchen Knife Forums:

This site may earn a commission from merchant affiliate links, including eBay, Amazon, and others.

Keith Sinclair

Senior Member
Joined
May 10, 2012
Messages
6,038
Reaction score
3,468
Location
Hawaii
How do you cut in your 45% bevels.

When was helping Stefan Keller I made handles for my knives. Also some for students at culinary school. He had the tools in his shop. A big disk sander set table at 45% & grind checking as you go. That thing made me a little nervous did do about a dozen handles on it.
He also had a jig used with bandsaw I liked that better.

I have a table drill press & 1/42 belt sander that have used for all kinds of stuff. With these can make western scale knife handles & oval wa handles. Hardly make handles anymore. Just curious different ways folks cut 45% for wa octagons.

Oval out of African blackwood & Spalted Hawaiian Signature wood. Made for my trusty iron clad Watanabe. Just thinking about this makes me miss Stefan we had some good times.
image.jpg
IMG_20210713_132758122.jpg
IMG_20210713_133359022.jpg
 
Stefan and Fish & Poi were my inspirations when setting out doing my first handle...He was a class act.
 
Most experienced makers do them freehand. Jobone has lots of videos showing his technique. Prior to that, you can use 45 degree wedges on a disc sander for good results, but if you want tapered handles, doing a bunch of scraps freehand is the best way to get a feel for it
 
I have a jig for my table saw. It’s easy and reproducible. I can pass that time savings onto the clients. For materials that I don’t want to put on my sawstop, I have 45 degree wedges I use as a guide on the grinder.
 
But do be reassured that if you’re not doing lots of handles and don’t have (or can’t be bothered setting up) a table saw or belt grinder you can get perfect results with just a hand plane and/or sandpaper on a sheet of glass
 
If starting from a rectangular block with the final height/width of the handle, I then scribe 5-7mm from each face so I know how far to sand. And since I don't have many fancy tools, I ghetto the scribe with a piece of scrap wood and a pencil. The sanding I do with sandpaper on a flat plane.
 
I use a sander for my shaping. When starting, I used a cheap 4x36 belt sander for everything. At some point I added a 12” disc. Now I mainly use a combo of the disc with 6x48 and 2x72 belts.

Here’s a photo my first workshop.
DE693498-8D16-4A98-8BD4-6625984DFAF3.jpeg
 
Last edited:
This would take roughly 2 seconds per side on a router table with a chamfer bit.
 
Free hand, with a 4x36 for me as well.

I pencil in the shape on the ends, then bevel all facets on each end at around 45º, then decrease the angle until each facet meets.
 
My 45 degree bevels are not 45 degrees! 🤣

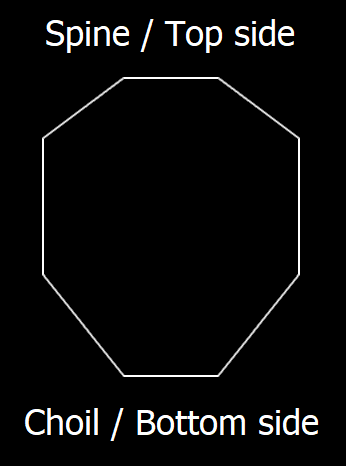
I try to get it asymmetrical from top to bottom - Something like the over-exaggerated picture below. Feels a bit more comfortable IMO.
Prefer to do it by hand.

9nYfbgR.png


This would take roughly 2 seconds per side on a router table with a chamfer bit.

As @KnightKnightForever mentioned - Taper in the handle really throws off the simplicity of something like a router bit.

When the handle is fatter at the butt (both top-to-bottom and side-to-side)... Not going to lie, it hurts my dumb head thinking about how I would get that to work.
I think you'd need to shim the ferrule side of the handle against both the table and the bearing of the bit.

It might also get a bit wild with metal spacers :oops:
 
Last edited:
My 45 degree bevels are not 45 degrees! 🤣

I try to get it asymmetrical from top to bottom - Something like the over-exaggerated picture below. Feels a bit more comfortable IMO.
Prefer to do it by hand.

9nYfbgR.png


As @KnightKnightForever mentioned - Taper in the handle really throws off the simplicity of something like a router bit.

When the handle is fatter at the butt (both top-to-bottom and side-to-side)... Not going to lie, it hurts my dumb head thinking about how to get it to work.
I think you'd need to shim the ferrule side of the handle against both the table and the bearing of the bit.

It might also get a bit wild with metal spacers :oops:


I dig yo handle shape.
 
As @KnightKnightForever mentioned - Taper in the handle really throws off the simplicity of something like a router bit.

When the handle is fatter at the butt (both top-to-bottom and side-to-side)... Not going to lie, it hurts my dumb head thinking about how to get it to work.
I think you'd need to shim the ferrule side of the handle against both the table and the bearing of the bit.

It might also get a bit wild with metal spacers :oops:
I thought about this. You first get your taper on the bandsaw (or handsaw) then hit the router. You refine the shape with a #4 hand plane and maybe some sanding.

And the spacers are “it depends” because some materials a carbide bit will just eat, but others…scary.

I just hate sanding ngl
 
Metal spacers could indeed be interesting 😬

The shortcoming of the router is when you want progressive bevels that widen/narrow along with the handle taper. This is what you're trying to solve for with the shimming in two dimensions right @Kippington ? If you're just looking for a bevel that is consistent front to back, then a router would be fine. Although you'd want to take care to avoid tear-out.
 
Last of stash African Blackwood & Spalted Hawaiian Signature made this for my TF Nashiji just put on last coat. For me oval is comfortable not too long or skinny as have rather large hands. The top is thicker less rounded the bottom little thinker more rounded found this to feel better in the hand. I will buff it after installation.
IMG_20230111_183354725.jpg

Top
IMG_20230111_182927481.jpg

Bottom
IMG_20230111_182913454.jpg

IMG_20230111_183222190.jpg

IMG_20230111_183126069.jpg
 
I like to repair old cracked handles found this ground turquoise in my handle making drawer. Mixed it with epoxy didn't mix or blend Duh :rolleyes: . Just ordered turquoise color to mix with epoxy. I hate to waste stuff at least I'll try on some old handle mixing some real turquoise grounds with color & epoxy see if it looks decent.
 
I have put in tapers on both sides of the handle and used a router with no issues...Finish it on an engineer plate fairly quick.
 
Jobone (Joe) handle from Sugi Cutlery. Simple horn & beautifully figured Desert Ironwood. On my new Yoshikane SKD. Two knives I kind of regret selling to students were my Dave Martell spa treatment Hiromoto & my Yoshikane SKD that I bought from Japan Woodworker catalogue. Used as pass arounds & many request to buy them. Was thinking of getting white steel but went with SKD. To say I like this blade is understatement.

Also from Sugi got Rosewood with copper spacer horn ferrel. It maybe Joe's too. Not much for metal spacers, but this copper is nice on Damascus blade.
IMG_20230212_104753091.jpg
IMG_20230212_104651777_HDR.jpg
image.jpg
 
My 45 degree bevels are not 45 degrees! 🤣

I try to get it asymmetrical from top to bottom - Something like the over-exaggerated picture below. Feels a bit more comfortable IMO.
Prefer to do it by hand.

9nYfbgR.png


^Ditto^ This design, or the same thing but the bottom three sides of the octagon rounded to oval, are what I find the most comfortable.

Though I rarely do the latter because I think the lines look nicer.
 
Yep wider top side little narrower bottom where ends of fingers wrap around most comfortable for me 😁
 
Back
Top